안녕! 요새 날씨 너무 덥지,  어떻게 지내?

얼마 전에 개봉한 크리스토퍼 놀란 감독의 신작 영화 《오디세이》를 보고 왔는데,
보는 내내 소름이 돋아서 너에게 추천하고 싶어서 이렇게 몇 자 적어봐.

다들 잘 아는 호메로스의 고전 서사시가 원작인데, 놀란 감독 특유의 압도적인 연출력이 더해지니까 완전히 새로운 차원의 영화가 됐더라고.

스토리는 이미 많이 알려진거라 별 다를게 없긴해. 
트로이 전쟁을 승리로 이끈 이타카의 왕 오디세우스(맷 데이먼)가 고향으로 돌아가는 10년간의 험난한 여정을 그린 영화란거는 잘 알잖아, 그치.
집으로 향하는 바다 위에서 수많은 시련과 신들의 방해를 마주하며 집념 하나로 버텨내는 오디세우스의 사투가 정말 처절하면서도 웅장하게 그려져. 저렇게까지 해야하나 할만큼 그 의지가 단단하게 느껴지면서도 한편으론 짠하기도 하더라고.

그 사이 고향 이타카에 남아있는 가족들의 서사도 정말 흥미진진해.
오디세우스가 죽었다고 믿는 구혼자 무리의 대표 안티노오스(로버트 패틴슨)가 왕좌와 왕비를 차지하려고 집요하게 위협하는데, 연기를 너무 잘 해서 그런지 짜증 짜증 왕짜증이나더라고. ㅋ.
아내 페넬로페(앤 해서웨이)는 품위를 잃지 않고 끝까지 지조를 지켜내거든. 아~ 앤 해서웨이 연기 정말 멋지고 끝까지 그 아름다움이란 말로 표현이 안되. 아들 텔레마코스(톰 홀랜드) 역시 아버지의 빈자리를 지키며 구혼자들에게 맞서 성숙해가는 과정이 정말 몰입감 넘쳐.

여기에 지혜의 여신 아테나(젠데이아)가 오디세우스 부자를 조력하는 과정이나, 충직한 부관 에우릴로코스(히메쉬 파텔)와의 케미도 좋았고, 배우들의 연기 합이 엄청나. 장면 장면마다 얼마나 리얼한지 소오름.

한가지 아쉬웠던 점은 "오디세우스"와 [연모 / 귀향 지연] 관계(오디세우스에게 반해 그를 섬에 가두고 돌아가지 못하게 막는 인물)로 원작소설에서는 칼립소의 비중이 큰데, 영화에서는 그 서사는 그리 비중있게 다루지 않았더라구. 

이 영화 정말, 스케일도 엄청나고 인간의 의지와 집념을 그려낸 스토리가 가슴을 묵직하게 울리는 작품이야. 화면 구성이랑 사운드 연출이 압도적이라 이건 꼭 스크린으로 봐야 진짜 진가를 느낄 수 있어. 두번 봐도 후회 안 할 테니 꼭 보는 걸 추천해. 다음에 나랑 같이 봐도 좋구.

워낙 세계관이 크고 긴 스토리라 인물관계도 정도는 머리에 넣어두고 보는걸 추천해.
그럼 이만 빠~이~

오디세우스 등장인물 관계도

영화 오디세이 출연진 및 배역 정보

배역 (배우이름) 주요 역할 설명
오디세우스 (맷 데이먼) 이타카의 왕이자 영화의 주인공. 트로이 전쟁 후 고향으로 돌아가기 위해 10년간의 고난 길에 오릅니다.
텔레마코스 (톰 홀랜드) 오디세우스와 페넬로페의 아들. 아버지의 빈자리를 지키며 구혼자들의 위협에 맞섭니다.
페넬로페 (앤 해서웨이) 이타카의 왕비이자 오디세우스의 아내. 남편이 돌아올 것이라 믿으며 구혼자들의 구애를 물리치고 지조를 지킵니다.
안티노오스 (로버트 패틴슨) 페넬로페에게 구혼하는 무리의 대표 격 인물. 이타카의 왕좌를 노리며 텔레마코스를 위협합니다.
아테나 (젠데이아) 지혜와 전쟁의 여신. 오디세우스와 그의 아들 텔레마코스를 조력하고 보호합니다.
칼립소 ( 샤를리즈 테론) 오디세우스를 사로잡아 자신의 섬에 7년간 가둬두고 귀향을 지연시키는 요정/신.
헬레네 / 클리타임네스트라 (루피타 뇽오) 트로이 전쟁의 원인이 된 세계 최고의 미녀 헬레네와 그녀의 자매.
에우릴로코스 (히메쉬 파텔) 오디세우스의 귀향길에 함께하는 충직한 부관이자 동료.


영화 오디세이 배역 관계도

배역 관련 상대 배역 관계 관계 배역과의 주요 스토리 설명
오디세우스 (맷 데이먼) 페넬로페 (앤 해서웨이) 부부 트로이 전쟁 승리 후, 10년 동안 고향 이타카와 아내 페넬로페에게 돌아가기 위해 사투를 벌입니다.
  텔레마코스 (톰 홀랜드) 부자 아버지의 귀환을 믿는 아들과, 아들을 다시 만나기 위해 긴 여정을 견디는 아버지의 관계입니다.
  아테나 (젠데이아) 신과 영웅 아테나 여신의 도움과 보호를 받으며 수많은 시련을 극복하고 귀향길을 이어갑니다.
  에우릴로코스 (히메쉬 파텔) 군신/동료 긴 여정을 함께하는 믿음직한 부관으로, 오디세우스의 명령을 따르며 때로는 충언을 아끼지 않습니다.
  칼립소 ( 샤를리즈 테론) 연모 / 귀향 지연 칼립소는 오디세우스에 반한 나머지, 오디세우스를 사로잡아 자신의 섬에 7년간 가둬두고 귀향을 지연시키는 요정/신.   
텔레마코스 (톰 홀랜드) 페넬로페 (앤 해서웨이) 모자 아버지가 없는 이타카에서 어머니를 지키고, 함께 구혼자들의 위협에 맞섭니다.
  안티노오스 (로버트 패틴슨) 적대 구혼자 무리를 이끌며 이타카의 왕좌를 노리고 자신과 어머니를 위협하는 안티노오스에 대항합니다.
  아테나 (젠데이아) 신과 조력자 아테나 여신의 가르침과 인도를 받으며, 구혼자들을 물리치고 아버지를 찾기 위한 성장을 이뤄냅니다.
페넬로페 (앤 해서웨이) 안티노오스 (로버트 패틴슨) 피구혼자/적대 끈질기게 청혼하며 자신과 이타카를 차지하려는 안티노오스의 구애를 지혜롭게 물리치며 지조를 지킵니다.
헬레네 / 클리타임네스트라 오디세우스 (맷 데이먼) 간접적 원인 트로이 전쟁의 발발 원인이 된 인물로, 오디세우스를 고향에서 떠나게 만든 간접적인 배경이 됩니다.


e북리더 디스플레이와 외형을 갖고 있으면서, 

노트 필기 기능을 주 기능으로 가진 e-잉크 전자노트

구글플레이스토어도 있어서 다양한 앱 설치되고,

녹음 재생, 필기, 리더, pdf, 웹툰보기도 되고 . . .

한번 써보고 싶네

https://youtu.be/vhsGHcd5vYc?si=Xr24cmjpyqZUCR02


https://viwoods.co.kr/tablet/?idx=2#prod_detail_detail


Viwoods AiPaper Mini : 비우즈 (viwoods)

비우즈 viwoods는 일상과 업무에 바로 활용할 수 있는 실용 전자책 콘텐츠를 만드는 전자책 브랜드입니다

viwoods.co.kr


1. 취약점 개요 (NGINX Rift)

항목내용

CVE ID CVE-2026-42945(NGINX Rift)
CVSS 점수 CVSS v4.0 9.2 / Critical
취약점 유형 CWE-122, 힙 기반 버퍼 오버플로우
영향 및 위험 - 인증 없이 워커 프로세스 충돌(DoS)
- ASLR 비활성화 시 RCE 가능
- 반복 트리거를 통한 서비스 가용성 중단
취약 버전 NGINX Open Source 0.6.27 ~ 1.30.0
NGINX Plus R32 ~ R36
패치 버전 NGINX Open Source 1.30.1 / 1.31.0
NGINX Plus R32 P6 / R36 P4

* CVE 식별자: CVE-2026-42945
* 영향받는 모듈: 리라이트 모듈 (ngx_http_rewrite_module)
* 취약점 유형: 힙 버퍼 오버플로우 (Heap Buffer Overflow)
* 발생 조건: NGINX의 특정 리라이트(Rewrite) 설정과 정규 표현식 캡처(Regular Expression Capture) 기능이 함께 사용될 때, 메모리 힙 영역에서 할당된 버퍼 크기를 초과하여 데이터를 덮어쓰는 문제가 발생합니다.


2. 발생할 수 있는 위험성 (Impact)

이 취약점은 공격자가 복잡한 인증 과정을 거칠 필요가 없다는 점에서 그 위험도가 매우 높습니다.

* 인증 없는 원격 코드 실행(RCE): 공격자가 특수하게 조작된 HTTP 요청을 서버로 보내는 것만으로, 외부에서 악의적인 명령이나 코드를 실행할 수 있습니다.
* 서비스 거부(DoS): 버퍼 오버플로우를 악용해 NGINX 프로세스를 강제로 종료시키거나 비정상적인 동작을 유발하여, 정상적인 웹 서비스를 중단시킬 수 있습니다.
* 서버 권한 탈취: 특히 운영체제의 주소 공간 레이아웃 임의화(ASLR) 기능이 비활성화되어 있는 환경이라면, 공격자가 메모리 구조를 예측하여 서버의 최고 관리자 권한을 탈취하고 시스템 전체를 장악할 가능성이 큽니다.


3. 대응 및 조치 방안 (Remediation)

가장 확실하고 근본적인 조치는 NGINX 벤더(F5)에서 제공하는 최신 보안 패치 버전으로 업데이트하는 것입니다.

  A. 근본적 조치 (보안 업데이트 적용)

  현재 사내에서 운영 중인 NGINX 버전을 확인하시고, 아래의 안전한 버전 이상으로 즉시 업데이트해야 합니다.
    * NGINX Open Source: 1.30.1 버전 이상으로 업데이트    * NGINX Plus: R32 P6 버전 이상으로 업데이트

<조사 및 조치>

1) NGINX Open Source는 1.30.1(stable) 또는 1.31.0(mainline)으로 업그레이드합니다. 
   워커가 패치된 바이너리를 로드하도록 nginx -s reload가 아닌 프로세스 재시작을 수행해야 합니다
   $ nginx -v (배포판인 경우 nginx -V)  ;명령 결과가 버전 1.30.1 또는 1.31.0 아닌 경우 버전 업데이트 한다 

2) $ grep -rn 'rewrite.*\?.*\$[0-9]' /etc/nginx/    ; 설정파일에서 취약 패턴을 검색한다

3) nginx 에러 로그에서 워커 비정상 종료 시그널(signal 11 (SIGSEGV), signal 6 (SIGABRT))이 반복 발생하는지 점검한다

4) 액세스 로그에서 %26, %2B, %25 등 인코딩 문자가 대량 포함된 비정상 URI 패턴이 있는지 확인

5) NGINX Plus는 R32 P6 또는 R36 P4를 적용합니다.
  Instance Manager, App Protect WAF/DoS, Gateway Fabric, Ingress Controller도 F5 권고(K000161019)에 따라 함께 업데이트

6) 즉시 패치가 불가능한 경우, unnamed 캡처($1, $2)를 named 캡처((?<name>...) / $name)로 변경하여 취약 코드 경로를 우회한다

7) WAF 또는 IDS에 단일 URI 내 인코딩 문자(%26, %2B, %25)가 비정상적으로 다수 포함된 요청을 탐지·차단하는 룰을 배포합니다.

8) 동시에 공개된 CVE-2026-42946, CVE-2026-40701, CVE-2026-42934도 패치 대상에 포함합니다.

  B. 임시 조치 (Workaround)

  만약 시스템 영향도 파악이나 테스트 기간 확보 등으로 인해 즉각적인 패치 적용이 어렵다면, 리라이트 설정 변경을 통해 취약점 발생 조건을 회피할 수 있습니다.

    * nginx.conf 등의 설정 파일 내 리라이트(Rewrite) 규칙에서 사용 중인 정규 표현식의 '명명되지 않은 캡처(unnamed capture)'를 모두 '명명된 캡처(named capture)'로 변경하시기 바랍니다.

참고. 주요  용어 정리

1. 리라이트 모듈 (Rewrite Module, ngx_http_rewrite_module)
기능: 클라이언트(사용자)가 요청한 URL을 서버 설정에 따라 다른 URL로 변경하거나, 다른 경로로 넘겨주는(리다이렉션) 역할을 합니다.

동작 방식: 예를 들어 사용자가 http://example.com/old-page로 접속했을 때, 리라이트 모듈 규칙에 따라 내부적으로 http://example.com/new-page의 내용을 보여주거나, 접속 자체를 새 주소로 튕겨냅니다. 웹 서버 설정에서 매우 빈번하게 사용되는 핵심 기능입니다.

2. 정규 표현식 캡처 (Regular Expression Capture)
기능: 특정한 규칙을 가진 문자열 패턴(정규 표현식)에서, 필요한 특정 부분만 쏙 뽑아내어 임시로 기억해 두는 기능입니다.

동작 방식: * 리라이트 모듈과 함께 자주 쓰입니다. 예를 들어 /user/1234라는 요청이 들어왔을 때, 1234라는 숫자 부분만 추출하여 다른 URL을 만들 때 재사용하고 싶을 수 있습니다.

이때 정규식에서 괄호 ()를 사용해 패턴을 묶어주면, 서버는 괄호 안에 매칭된 텍스트(1234)를 '캡처'하여 내부 변수에 저장해 둡니다.

3. 메모리 힙 영역 (Memory Heap)
기능: 프로그램(여기서는 NGINX)이 실행되는 동안, 크기를 미리 예측할 수 없는 데이터를 임시로 저장하기 위해 동적으로 할당받아 사용하는 메모리 공간입니다.

동작 방식: 사용자가 요청하는 URL의 길이나 캡처된 문자열의 길이는 매번 다릅니다. 따라서 서버는 "이 텍스트를 저장하기 위해 메모리 100바이트만 빌려줘"라고 운영체제에 요청하여 힙 영역의 공간을 사용하고, 작업이 끝나면 반납합니다.

4. 힙 버퍼 오버플로우 (Heap Buffer Overflow)
기능/현상: 프로그램이 할당받은 힙 메모리 공간(버퍼)보다 더 큰 데이터를 강제로 집어넣어, 허용된 경계를 넘어서(오버플로우) 인접한 다른 메모리 영역을 덮어쓰게 되는 치명적인 버그입니다.

동작 방식: 이번 NGINX 취약점의 핵심입니다. 해커가 특수하게 조작된 요청을 보내면, NGINX가 캡처된 데이터를 힙 영역에 저장할 때 자신이 빌린 공간보다 더 많은 데이터를 기록하게 됩니다. 이로 인해 바로 옆에 있던 중요한 시스템 데이터나 '다음 실행할 코드의 주소' 등이 덮어씌워지고, 해커는 이를 이용해 서버를 멈추게 하거나 자신이 원하는 악성 코드를 실행시킬 수 있습니다.

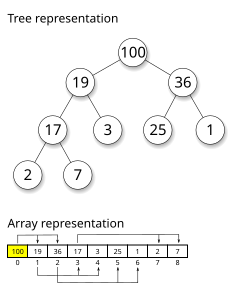
    * 힙 버퍼 (Heap Buffer)란?
       binary heap 구조를 버퍼 형태로 구현한 것 

           ** 버퍼 오버플로우가 발생한다면, 예를 들어, 2번 버퍼에 값이 '36'이 들어있고, 3번 버퍼에 값 '17' 이 들어있는데, 2번 버퍼에 오버플로우를 일으켜서 허용된 값보다 더 큰 값을 강제 저장하면, 2번 버퍼의 영역을 넘어가서 3번 버퍼의 일부 영역에 데이터가 기록되는 문제가 발생한다.

 
5. 주소 공간 레이아웃 임의화 (ASLR, Address Space Layout Randomization)
기능: 해커의 메모리 공격을 방어하기 위해 운영체제(Windows, Linux 등)가 기본적으로 제공하는 보안 기법입니다.

동작 방식: 프로그램이 실행될 때마다 메모리(힙, 스택, 라이브러리 등)가 배치되는 주소를 무작위로(랜덤하게) 섞어버립니다. 해커가 버퍼 오버플로우를 이용해 악성 코드를 실행하려면 시스템의 특정 메모리 주소를 정확히 알아야 하는데, ASLR이 켜져 있으면 주소가 계속 바뀌므로 공격이 매우 어려워집니다. 반대로 이 기능이 꺼져 있다면 해커가 메모리 주소를 쉽게 예측할 수 있어 서버 장악이 훨씬 쉬워집니다.

6. 명명되지 않은 캡처 vs 명명된 캡처 (Unnamed vs Named Capture)
앞서 설명한 '정규 표현식 캡처'를 코드에 작성하는 두 가지 방식입니다.

A. 명명되지 않은 캡처 (Unnamed Capture):

    동작: 단순히 괄호 ()로만 묶어서 캡처하는 방식입니다.

    사용: 첫 번째 괄호는 $1, 두 번째 괄호는 $2처럼 순서에 기반한 숫자 변수로 알아서 저장됩니다. (예: ^/user/(.*)$)

    ⚠️ 이번 취약점은 NGINX가 이 '명명되지 않은 캡처'를 처리하는 과정에서 발생합니다.

B. 명명된 캡처 (Named Capture):

    동작: 괄호 안의 데이터에 프로그래머가 직접 이름을 붙여주는 방식입니다.

    사용: (?<username>.*) 형태로 작성하면, 캡처된 데이터가 $username이라는 명시적인 이름의 변수로 저장됩니다.

    💡 임시 조치 원리: 취약점이 있는 엔진엑스 버전이라도, 설정 파일(nginx.conf)을 수정하여 캡처 방식을 '명명된 캡처'로 모두 바꾸게 되면, 취약점이 발생하는 문제가 된 코드를 거치지 않고 안전하게 처리되기 때문에 임시 방어벽 역할을 할 수 있습니다.


7. 원격 코드 실행(RCE, Remote Code Execution)

정의: 단어 그대로 해커가 물리적으로 떨어져 있는 원격지(외부 인터넷 등)에서, 타깃이 되는 대상 서버나 시스템에 자신이 원하는 임의의 악성 명령이나 시스템 코드(Code)를 강제로 실행(Execution)할 수 있는 상태

RCE 취약점이 발견되면 보통 위험도 평가(CVSS)에서 9~10점(만점)에 해당한다.

* 정보유출 및 파괴, 랜섬웨어 및 악성코드 감염, 백도어 설치, 사내망 측면 이동(내부 시스템 감염) 등으로 영향이 확산될 수 있는 여지를 준다.

* 힙 버퍼 오버플로우는 그 결함을 악용해서 RCE(원격코드실행)를 획득하기 위한 수단으로 사용된다 

동작: 


  • 취약점 악용: NGINX 같은 웹 서버에 '힙 버퍼 오버플로우'와 같은 치명적인 결함을 악용합니다.
  • 악성 데이터 전송: 해커가 정상적인 웹 요청(URL 등)인 것처럼 위장하여, 그 안에 실행시키고 싶은 악성 명령어(Payload)를 숨겨서 서버로 보냅니다.
  • 명령어 강제 실행: 서버가 이 조작된 데이터를 처리하다가 버퍼 오버플로우가 발생하면서 메모리가 망가지고, 이 틈을 타 해커가 숨겨둔 악성 코드가 서버의 운영체제 위에서 직접 실행되어 버립니다.


서버 환경에 맞춰 nmap은 설치되어있다고 가정한다.

nmap 스캔방법


1.# 가장 기본적인 스캔 방법

 - target ip 1개를 직접 입력, T4 기본 옵션 사용 

$ /usr/lib/nmap/nmap -sS -T4 --open \
  -p- \
  123.123.123.123 \
  -oN 20260326_single_scan_result.txt\
  -v

    - 123.123.123.123 ip를 타겟으로 nmap 디폴트 설정대로 스캔한다
    - oN 옵션 : 결과를 텍스트 파일로 저장한다
    - v 옵션 : 실행과정을 화면에 보여준다 


2.# target ip 목록을 대상으로 tcp port all scan 0-65535 스캔 

$ /usr/lib/nmap/nmap -sS -T4 --open \
  -p 0-65535 \
  --min-hostgroup 10 \
  -iL targetlist.txt \
  -oN 20260326_project_allport.txt \
  -oX 2026032601_vuln_project_result.xml \
  -v

    -p 옵션 : 스캔할 tcp port 범위를 지정
    --min-hostgroup 10 옵션 : 타겟호스트가 많으면 10개단위로 묶어서 한번에 스캔한다 
    -iL 옵션 : 타겟호스트가 많아서 IP 목록을 파일로 읽어온다 
    -oX 옵션 : 결과를 xml형식으로 저장한다. 다른 프로그램에서 결과를 재활용하기 편리하다 


3.# well-known web 취약점 스캔 (일명 vuln. scan)

 * (http-brute 옵션은 무작위 로그인 시도로 인해 서버 계정이 잠길 수 있기에 생략)

* 많이 알려진 web 취약점 항목만 스캔하는 방식이다 

$ sudo nmap -sV -sC -T3 \
  -p 80,443,8080,8443 \
  --script "vuln,http-enum,http-methods,http-headers,http-default-accounts,\
http-auth-finder,http-config-backup,http-git,http-robots.txt,\
http-security-headers,http-shellshock,http-php-version,\
http-backup-finder,http-cors,http-open-redirect,\
ssl-cert,ssl-enum-ciphers,http-title,banner,\
http-sql-injection,http-xssed,http-unsafe-output-escaping,\
http-passwd,http-userdir-enum,\
http-auth,http-cookie-flags,http-domino-enum-passwords,\
http-trace,http-put" \
  --script-args "http.useragent='Mozilla/5.0',vulns.showall" \
  --min-hostgroup 10 \
  --max-retries 3 \
  --randomize-hosts \
  -iL targetlist.txt \
  -oN 2026032601_vuln_project_result.txt \
  -oX 2026032601_vuln_project_result.xml \
  -v

    --max-retries 3 : 실패시 재시도 횟수를 제한한다. 스캔 영역에 IPS/IDS가 있다면 필터링 예방을 위해 주로 사용한다
    --randomize-hosts : 스캔을 호스트 단위로 하지 않고 무작위로 스캔 순서를 분산시킨다.  IPS/IDS 회피 목적과 타겟호스트의 부하발생을 예방하는 효과가 있다 
  

테런스 하워드의 "Bitcoin Is Going to Die" 발언에 여러 시각에서 논쟁이 붙고 있다. (원문은 아래에)

테런스 하워드는  경제전문가도 아니고 비트코인 전문가는 더더욱 아닌, 헐리웃 배우이다.
그렇다고 어그로 끌기 관심성 발언이라고 무시하긴 어렵다. 지금 미-이란 사태에서 이 발언의 시사점이 분명히 있기 때문이다.

그는 어떤 관점에서 이 말을 했는지 살펴보고, 나름 냉정하게 분석해보고자 한다.

1. 저자 의도와 기사의 배경

CoinGape 편집팀이 작성한 이 기사는 할리우드 배우 테런스 하워드(Terrence Howard)가 패트릭 벳-데이비드(Patrick Bet-David)의 PBD 팟캐스트에 출연해 "Bitcoin Is Going to Die"라고 경고한 발언을 정리한 것이다.
기사 자체에는 깊은 경제적 분석이 없고, 단지 하워드의 주장을 소개하는 역할에 그치고 있다. 뉴스기사팀의 의도는 셀러브리티 발언을 통해 독자의 클릭을 유도하는 동시에, 비트코인의 달러 의존성이라는 논제를 자연스럽게 제시하는 데 있다.

하워드의 주장 요지는 세 가지다:
비트코인은 아직도 미국 달러로 가격이 매겨지기 때문에 달러 시스템에 종속되어 있고,
② 미·이란 분쟁 등 지정학적 불안이 달러 가치를 흔들면 비트코인도 함께 무너질 것이며,
금과 은이 비트코인보다 더 안전한 대안이다.


2. 하워드 주장의 근거와 역사적 사실관계 검증

하워드의 논거 중 과거에는 유효했던 부분이 분명히 있다. 비트코인과 미 달러 인덱스(DXY)의 역상관관계는 2023~2025년 동안 -0.4에서 -0.8 수준을 유지했으며, 달러 강세 국면에서 비트코인이 하락하는 패턴이 반복됐다.
2022년 말 달러 인덱스가 20년 최고치를 기록했을 때 비트코인은 4만7천 달러에서 1만6천 달러 아래로 급락했다.  (Ainvest)
이 점만 보면 하워드의 주장은 과거 데이터에 일정 부분 부합한다.
그러나 2026년 현재 시장 구조는 이 논리를 흔들고 있다.
JPMorgan의 2026년 분석에 따르면, 비트코인과 달러의 상관관계가 2014년 이후 처음으로 음수(-)에서 양수(+)로 전환됐다. 즉 비트코인이 이제는 달러와 반대로 움직이는 것이 아니라 달러와 함께 움직이는 '거시 자산'으로 탈바꿈하고 있다는 의미다.  (Yahoo Finance)
2026년 3월 초 달러 인덱스(DXY)가 96.6에서 99.4까지 3주 만에 상승하는 동안 나스닥100은 1% 하락하고 금은 3.6% 빠졌지만, 비트코인은 6만8천 달러 위를 유지했으며 이 기간 약 15억 달러의 ETF 자금이 순 유입됐다.  (24/7 Wall St.)
이는 하워드가 주장하는 "달러 강세 = 비트코인 붕괴" 공식이 더 이상 자동적으로 작동하지 않음을 보여주는 실증 사례다.

3. 핵심 쟁점: 비트코인은 정말 달러에 종속되어 있나?

하워드의 논리는 "비트코인이 달러로 가격 매겨지는 한, 달러 시스템의 종속변수"라는 것이다. 이는 표면적으로 타당해 보이지만, 경제학적으로는 가격 표시 통화(denomination)와 가치 결정 구조(value determinant)를 혼동한 논리적 오류다. 원유, 금, 구리도 모두 달러로 표시되지만 이들이 달러에 '종속'되어 있다고 말하지는 않는다.
2026년 현재 비트코인 현물 ETF의 운용자산이 주요 제공사 합산 850억 달러를 초과했으며, 여러 포춘500 기업들이 현금 보유액의 25%를 비트코인에 배분하고 있다. ETF 주간 순 유입이 5억 달러를 넘을 경우 이후 2주 내 비트코인 가격이 37% 오르는 상관관계가 강화되고 있다.  (Bitget) 이는 비트코인이 달러 시스템의 부속물이 아니라, 기관 자본 흐름의 독립적 수신처로 자리 잡아가고 있음을 의미한다.

4. 금·은 선호 논거의 타당성과 한계

하워드가 금과 은을 선호하는 주장은 현재 시장 흐름과 일정 부분 일치한다.
헤지펀드들은 2025년 4분기 비트코인 ETF 보유량을 28% 줄이고 금으로 이동했다. 2025년 금 ETF 자산은 4,070억 달러로 비트코인 ETF(1,660억 달러)의 두 배를 초과했으며, 금은 2025년 55% 이상의 수익률을 기록한 반면 비트코인은 연간 6% 하락했다.  (CCN)
2025년 4분기 금은 65% 상승한 반면 비트코인은 23.5% 하락했으며, BTC 대 금 비율은 2026년 초 역사적 최저 수준을 기록했다.  (Ainvest)
그러나 금·은도 장점만 있는 것은 아니다. 2026년 초 금이 달러 강세 국면에서 3.6% 하락하는 동안 비트코인은 오히려 견조함을 유지했다.  (24/7 Wall St.) 지정학적 공포 프리미엄이 가장 컸던 순간조차 금이 비트코인보다 반드시 우월하지는 않았다는 것이다.

5. 지정학적 리스크와 비트코인 — 찬반 논쟁

하워드 논리에 유리한 증거:
지정학적 긴장이 고조될 때 역사적으로 금 수요가 급등하며, 미국의 이란 공격 가능성은 금 가격에 더 강한 상승 압력을 만들 수 있다.  (CCN)

하워드 논리에 불리한 증거:
비트코인은 최근 중동 지정학적 긴장 속에서도 6만8천 달러 위를 유지하는 방어적 특성을 보였으며, 기관투자자들이 비트코인을 투기 자산이 아닌 영구적 포트폴리오 구성 요소로 편입시키고 있다는 점이 이를 뒷받침한다.  (Blockchain Magazine)

6. 경제전문가 시각에서의 종합 평가

하워드의 발언은 배우로서의 직관적 위험 회피 성향을 표현한 것으로, 일부 역사적 사실에 기반하지만 구조적 변화를 반영하지 못한다.

다음 세 가지 점에서 경제 분석으로서의 한계가 뚜렷하다.
첫째, 시대착오적 상관관계 적용이다. 2022년까지는 달러 강세 = 비트코인 하락의 공식이 유효했으나, 2025년 한 해 동안 미국의 비트코인 현물 ETF와 디지털 자산 트레저리가 신규 채굴량과 유통 공급량 증가분의 1.2배를 흡수하며 구조적 수요 기반이 완전히 바뀌었다.  (Ark Invest)

둘째, "비트코인은 죽는다"는 주장의 근거 부재다. 비트코인이 소멸하려면 전 세계 인터넷망이 붕괴되거나 2,100만 개의 공급 상한 이라는 코드가 전 세계적 합의로 폐기되어야 한다. 이는 현실적으로 불가능에 가깝다. 현재 웰스파고, 뱅크오브아메리카, 뱅가드 등 주요 대형 금융기관들이 고객들에게 비트코인 ETF 접근을 개방하고 있으며, JPMorgan과 BofA의 자산관리 부문은 고객 순자산의 1~5%를 암호화폐에 배분하도록 제안하고 있다.  (DL News)

셋째, 단기 변동성과 장기 생존 가능성의 혼동이다. 하워드가 지적한 "18,000→125,000→$61,000"의 극단적 가격 진폭은 비트코인의 '죽음'이 아니라 성숙해 가는 신흥 자산 특유의 사이클을 보여주는 것이다. 실제로 스탠더드차타드, 캐시 우드(ARK Invest) 등 대형 기관들은 2026년 비트코인 가격 범위를 15만~25만 달러 구간으로 전망하고 있다.  (XS)

결론적으로,

하워드의 발언은 일반 투자자에게 극단적 가격 변동성에 대한 경계심을 갖게 하는 실용적 메시지를 담고 있지만, 이를 "비트코인 소멸론"으로 확대 해석하는 것은 현 시장 구조와 기관 채택 현실을 무시한 과도한 비관론이다.
포트폴리오 다각화 차원에서 금·은의 역할을 재평가하자는 제안 자체는 의미 있으나, 그 대안으로 비트코인을 완전히 배제하는 것은 지금 시점에서 데이터에 부합하지 않는 판단이다.

📚 참고 근거 자료
하워드 발언 소개 기사 > https://coingape.com/bitcoin-is-going-to-die-hollywood-fame-terrence-howard-warns/?utm_source=coingape&utm_medium=newsletter&_bhlid=f19c4e093b691b4aebc36631cd918f79ed68fe7d

"Bitcoin Is Going to Die"- Hollywood Fame Terrence Howard Warns Bitcoin Investors

Terrence Howard warns Bitcoin could die amid war tensions, dollar weakness, and sharp market volatility today. He said he prefers Gold and Silver over BTC.

coingape.com


Bitcoin's 12-Year Relationship With the Dollar Just Broke (247 Wall St., 2026.03.06)
→ https://247wallst.com/investing/2026/03/06/bitcoins-12-year-relationship-with-the-dollar-just-broke/
BofA Survey Shows Record Bearish Dollar Bets — What It Means for Bitcoin (CoinDesk, 2026.02.17)
→ https://www.coindesk.com/markets/2026/02/17/bofa-survey-shows-record-bearish-dollar-bets-here-s-what-it-means-for-bitcoin
Hedge Funds Slashed Bitcoin ETF Exposure by 28% in Q4 2025, Choosing Gold (CCN, 2026.02)
→ https://www.ccn.com/analysis/crypto/hedge-funds-bitcoin-etf-exposure-gold-buying/
Bitcoin's Sensitivity to U.S. Dollar Liquidity Shifts and Implications for 2026 (AInvest, 2026.01.30)
→ https://www.ainvest.com/news/bitcoin-sensitivity-dollar-liquidity-shifts-implications-2026-2601/
Bitcoin vs. Gold in 2026: Macroeconomic and Institutional Analysis (AInvest, 2026.01.27)
→ https://www.ainvest.com/news/bitcoin-gold-2026-macroeconomic-institutional-analysis-digital-traditional-safe-havens-2601/
Bitcoin's Evolving Institutional Role (ARK Invest / 21Shares, 2026)
→ https://www.ark-invest.com/articles/analyst-research/bitcoins-evolving-institutional-role
Bitcoin ETFs Enter 2026: Why Analysts Expect Over $180bn in Investment (DL News, 2025.12.29)
→ https://www.dlnews.com/articles/markets/bitcoin-etfs-to-top-180-billion-usd-in-2026-say-analysts/
Oil vs Gold vs Bitcoin: Understanding the Shifting Correlations in 2026 (Mudrex Learn, 2026.03.11)
→ https://mudrex.com/learn/oil-gold-bitcoin-correlation-2026/

하늘 위 마을버스, 섬에어 - 우리의 미래를 생각해보다

안녕, 요즘 어떻게 지내고 있어?

오랜만이야. 지난주 지옥철 타면서 봤던 뉴스가 자꾸만 자꾸만 떠올라서 말이야. 프로펠러 달린 '섬에어'라는 항공사가 올 상반기부터 국내 하늘길을 오갈 거라는 거 봤지? 솔직히 처음엔 그냥 '오, 신기하네' 정도였는데, 좀 더 깊이 생각해보니까 우리 같은 사람들의 삶과 무관하지 않더라. 편지로 풀어볼게.

섬에어, 도대체 뭐가 다른 걸까?

기사를 정리해보면, 섬에어는 프로펠러 항공기(터보프롭 방식)를 가지고 기존 항공사들이 외면하던 섬과 지방 내륙 지역을 연결하겠다는 거야. 72석 규모에 연료 효율이 좋고, 2천m 이하의 짧은 활주로에도 이착륙이 가능하다고 해. 쉽게 말해서 '하늘의 마을버스'를 자처한 거지.

김포~사천, 김포~울산 같은 노선부터 시작해서, 나중엔 울릉공항, 백령도, 흑산도, 심지어 일본 대마도까지 운항할 계획이래. 그 말은 뭘까? 지금까지 비행기를 탈 수 없었던 섬 주민들과 지방에 사는 우리 같은 사람들의 이동성이 높아진다는 뜻이야.

[이미지: 김포공항에 정렬된 섬에어 프로펠러 항공기의 측면 모습, 보랏빛 꼬리날개가 특징]

근데 왜 자꾸 불안한 마음이 들까?

뉴스의 핵심은 여기야. 기사에서 전문가도 지적했듯이, 신규 항공사 섬에어가 정말 살아남을 수 있을까?라는 게 큰 의문이야.

  • 고유가, 원화 약세: 이미 대한항공, 아시아나 같은 기존 항공사들도 경영난이 심한 상황이야. 연료비와 환율 때문에 항공업 자체가 녹록지 않다는 거지.
  • 수요 한계: 아무리 좋은 서비스라도 섬과 지방 노선의 절대 수요가 적어. 주말에 관광으로 한두 번 탈 사람은 있겠지만, 매일 수익을 내기는 어렵다는 뜻이야.
  • 과거 전례: 우후죽순 생겼다가 사라진 소형항공사들이 많아. 섬에어도 같은 길을 갈 수 있다는 게 전문가들의 우려야.

한 항공경영학과 교수도 말했듯이, 이건 사실 국가나 지방자치단체가 해야 할 일을 민간이 도맡으려는 거거든. 정책 지원 없이는 어렵다고 봐.

[이미지: 새벽빛 활주로 위에서 이륙 준비 중인 작은 항공기, 2026 노선현황]

그럼 우리는 이걸 어떻게 봐야 할까?

투자 관점에서 생각해보자:

  • 항공사 관련주는 신중하게: 혹시나 해서 항공업 관련 소액 주식을 생각 중이라면, 당분간은 주춤할 가능성이 높아. 고유가와 원화 약세가 풀리기 전까진 항공사들의 실적 회복이 어렵거든. 지금은 관찰 모드를 유지하는 게 낫겠어.
  • 지방 관광, 부동산에는 약간의 희망: 섬에어가 성공한다면 울릉도, 백령도 같은 섬 지역으로의 접근성이 좋아져. 관광 수요가 늘면 그 지역의 게스트하우스나 소형 숙박시설 관련주, 지역 부동산에는 긍정적일 수 있어. 하지만 이건 '만약'의 이야기고, 아직은 리스크가 커.
  • 적금은 계속 유지해: 항공 산업의 변화는 장기적인 현상이야. 지금처럼 금리가 괜찮을 때 안정적인 적금을 꾸준히 유지하는 게 최선이야. 경제가 불확실할수록 현금의 가치가 높아지니까.

생활 관점에서는:

  • 가까운 미래에 지방 출장이나 섬 여행이 늘어날 수도 있다는 정도. 비행기 요금이 내려간다면 우리도 가끔 휴가를 떠날 기회가 생길지 몰라.
  • 하지만 이건 섬에어가 성공했을 때의 이야기야. 지금은 '가능성' 정도일 뿐이야.

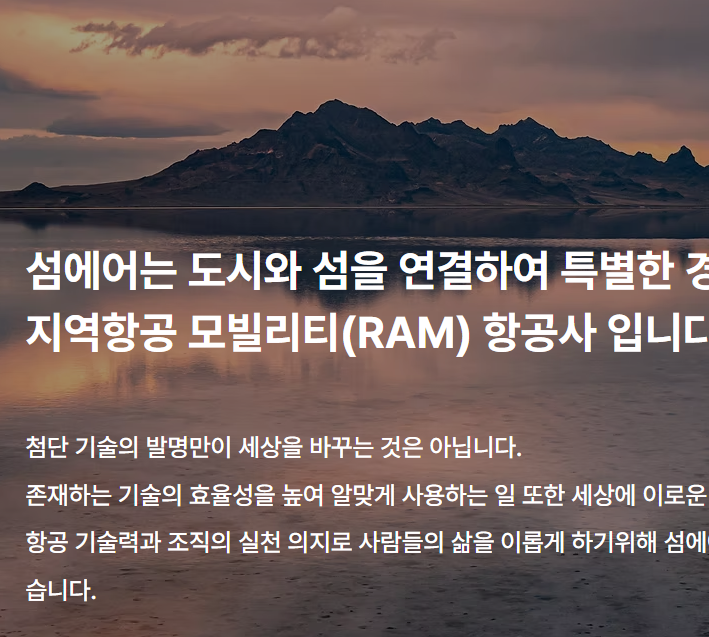
[이미지: 섬에어 소개]

결국, 뭘 하면 좋을까?

이 뉴스를 통해서 느껴야 할 핵심은 이거야: 우리 나라도 소외된 지역을 위해 신기술과 혁신을 시도하고 있다는 거. 섬에어가 성공하든 실패하든, 이런 시도가 우리의 이동성과 경제 활동 범위를 넓혀주는 건 사실이야.

하지만 현실적으로는, 우리가 할 수 있는 건 많지 않아. 다만:

  • 적금과 안정적 자산: 여전히 최우선이야. 기본을 지켜.
  • 소액 주식: 항공사 관련주는 아직 보류. 지금은 관망하면서 배당금 있는 우량주나 인프라 관련주에 눈을 돌려봐.
  • 시간을 갖고 관찰: 섬에어가 정말 운항을 시작하는 상반기까지, 항공업계의 흐름을 지켜보자. 그때 판단해도 늦지 않아.

마치면서

요즘 우리 같은 직장인들은 자꾸 미래를 걱정하게 되지. 고금리, 일자리 불안, 부동산 걱정... 끝이 없어. 하지만 이 뉴스를 보면서 느꼈던 건 누군가는 여전히 새로운 걸 시도하고 있다는 거야. 성공할지 실패할지는 모르겠지만, 그래도 누군가는 도전하고 있어.

우리도 그렇게 살아가야 하지 않을까? 쉽지는 않겠지만 말이야. 화이팅!

다시 만날 그날까지, 함께 버티자고.

#지역항공 #섬에어 #항공산업 #취향뉴스 #오늘뉴스 #취향편지
6주 연속 유가 하락, 우리의 지갑에 묻는 말

6주 연속 유가 하락, 우리의 지갑에 묻는 말

안녕, 요즘 어떻게 지내고 있니? 나는 여전히 매일 같은 출퇴근길을 반복하고 있어. 오늘따라 유가 뉴스가 눈에 들어왔는데, 생각해보니 너한테 꼭 얘기해야겠다는 생각이 들었어.

반가운 소식, 하지만 조심스러워

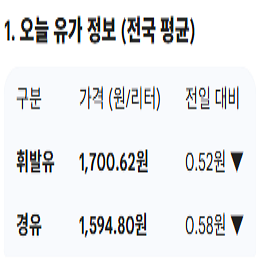
주유소 기름값이 6주 연속 하락했대. 휘발유가 리터당 1,706원, 경유가 1,601원까지 내려왔다고 해. 지난주보다 각각 14.5원, 18.1원씩 떨어진 거지. 솔직히 처음엔 반가웠어. 회사 가는 길에 주유소 가격표를 보면서 '아, 이제 조금은 숨이 좀 트이나?' 싶은 마음이 들었거든.

하지만 바로 다음 문장을 읽고 한숨이 나왔어. 국제유가는 이란 시위로 인한 지정학적 리스크 때문에 한번 올랐다가, 트럼프 대통령의 긴장 완화 발언으로 겨우 진정됐다는 거야. 결국 지금의 하락은 한두 나라 정치인의 발언 하나에 좌우될 수 있다는 뜻이잖아.

[이미지: 주유소 휘발유·경유 가격 안내판 사진]

우리의 지갑에 얼마나 도움이 될까?

매달 주유비를 생각해보면 실감이 난다. 한 달에 주유를 평균 5~6회 정도 하면서 한 번에 30~50리터씩 넣는다고 쳐도, 휘발유 14.5원 인하는 한 번에 435~725원을 아끼게 된다는 뜻이야. 한 달이면 2천 원대 후반에서 3천 원대까지 줄일 수 있다는 계산이 나와.

솔직하게 말하면, 이 정도의 절감액은 기쁘지만 우리 생활 전체를 바꿀 만큼 크지는 않다. 전월세 올려달라는 건 여전히 나오고 있고, 대출금리도 쉽게 내려가지 않거든. 하지만 작은 절감이라도 누적되면 적금이나 소액 투자에 조금씩 더 돌릴 수 있다는 점이 희망이야.

[이미지: 출퇴근 시간 도시 도로 위 자동차들의 모습]

다음 주도 내릴 거라고? 그럼 우리는?

대한석유협회는 다음 주에도 국내 기름값이 하락할 것으로 예상한다고 했어. 그렇다면 앞으로 몇 주일 더는 이 긍정적인 추세가 이어질 수 있다는 뜻이겠지. 물론 국제정치 상황이 언제 또 뒤집힐지 모르긴 하지만, 지금은 일단 이 흐름에 우리도 현명하게 대응해야 할 것 같아.

우리가 할 수 있는 현실적인 선택지들

  • 적금 유지 및 조금 더 공격적으로: 기름값이 내려가는 만큼 한두 달 동안 절감액을 저축할 수 있어. 기존 적금 외에 '유가 하락 기간 보너스 저축'으로 별도 통장을 만드는 것도 좋을 것 같아. 금리는 지금 3~4% 수준이니까 나쁘진 않거든.
  • 소액 주식은 장기 관점으로: 기름값 하락이 자동차 관련 주, 배송·물류 업체 주가에는 긍정적일 수 있어. 하지만 단기 변동성을 믿지 말고 3~6개월 이상의 장기 관점을 유지하는 게 안전하다고 봐.
  • 생활비 절감이 최고의 수익: 매달 2~3천 원이라도 주유비가 줄면, 그걸 '내 수익'이라고 생각하는 게 심리적으로 도움이 돼. 은행 이자보다 확실한 수익이거든.
  • 중장기: 주택 구매 자금 모으기: 유가 하락이 전반적인 물가를 내려누를 수 있다면, 금리 인하 가능성도 생긴다. 언젠가 전월세에서 벗어날 날을 위해 지금부터 차곡차곡 모으는 게 현명해.
[이미지: 통장과 통계 그래프, 또는 재정 계획 관련 사진]

마지막으로, 조금은 신중하게

좋은 소식도 언제까지 지속될지 모르는 게 우리의 현실이야. 유가는 국제 정치, 환율, 원유 수급 등 수많은 변수에 좌우되거든. 그래서 지금의 기쁨에 취해서 갑자기 큰 결정을 내리기보다는, 작은 절감을 꾸준히 모으는 게 우리 같은 서민의 정석이라고 생각해.

어쨌든 한 달에 몇천 원이라도 줄일 수 있다는 건 희망이야. 그 희망이 모여 언젠가는 더 큰 변화를 만들 거고.

너는 잘 지내고 있니? 다음에 만나면 이런 경제 이야기 말고 그냥 편하게 웃으며 마실 수 있으면 좋겠어. 그날을 기약하며 보낸다.

화이팅!

#유가하락 #생활비절감 #소액투자

데브옵스 엔지니어 필수 리눅스 명령어 세트 

데브옵스 엔지니어에게 핵심 리눅스 명령어를 숙달하는 것은 운영 효율성을 높이는 데 매우 중요합니다. 이 가이드는 CI/CD 파이프라인 관리, 컨테이너 오케스트레이션, 네트워크 문제 해결, 그리고 인프라 자동화 스크립팅을 위한 필수 명령어를 다룹니다.

CI/CD 파이프라인 관리

`git`: 버전 관리, CI 트리거.

git clone <repo-url>
git pull origin main
git commit -m "feat: add new feature"
git push origin main

DevOps Tip: CI 파이프라인에서 `git pull`을 자동화하여 항상 최신 코드를 사용하세요. 릴리스를 위해 특정 브랜치 태그를 활용하세요.

`ssh`: 안전한 원격 실행, 파일 전송.

ssh user@host "ls -la /var/www/html"
scp /local/path/file user@host:/remote/path/

DevOps Tip: 자동화 스크립트에서 비밀번호 없는 인증을 위해 SSH 키를 사용하세요.

`rsync`: 효율적인 파일 동기화.

rsync -avz /local/dir/ user@host:/remote/dir/

DevOps Tip: `--delete` 옵션이 있는 `rsync`는 배포 아티팩트 정리에도 유용합니다.

`find & xargs`: 파일 검색 및 명령 실행.

find . -name "*.log" | xargs rm

DevOps Tip: 오래된 로그 압축, 임시 파일 삭제 등 파일에 대한 대량 작업에 탁월합니다.

컨테이너 오케스트레이션

`kubectl`: 쿠버네티스 제어 도구.

kubectl get pods
kubectl apply -f deployment.yaml
kubectl logs <pod-name> -f

DevOps Tip: 디버깅 중 자세한 리소스 정보를 보려면 `kubectl describe`를 사용하세요.

`docker`: 컨테이너 런타임.

docker build -t myapp:1.0 .
docker run -d -p 80:80 myapp:1.0
docker ps -a

DevOps Tip: 다중 컨테이너 로컬 개발을 위해 Docker Compose를 학습하세요.

`crictl`: CRI (Container Runtime Interface) 도구.

crictl pods
crictl inspectp <pod-id>
crictl images

DevOps Tip: Kubernetes 노드에서 컨테이너 런타임 수준의 문제를 디버깅할 때 유용합니다.

네트워크 문제 해결

`ip`: 네트워크 설정 및 통계 관리.

ip addr show
ip route show

DevOps Tip: `ifconfig` 대신 `ip` 명령어를 사용하여 네트워크 인터페이스와 라우팅 정보를 확인하세요.

`lsof`: List Open Files (네트워크 소켓 포함).

lsof -i :80
lsof -i -P | grep LISTEN

DevOps Tip: 어떤 프로세스가 특정 포트를 사용하고 있는지 빠르게 찾을 수 있습니다.

`dig / nslookup`: DNS 쿼리 유틸리티.

dig example.com A
nslookup google.com

DevOps Tip: 분산 시스템에서 DNS 확인 문제를 진단하는 데 필수적입니다.

`curl / wget`: 데이터 전송 도구.

curl -I https://google.com
wget -O index.html https://example.com/

DevOps Tip: HTTP 요청 및 응답 디버깅을 위해 `curl -v`를 사용하여 자세한 출력을 확인하세요.

인프라 자동화 스크립팅

`jq`: JSON 프로세서.

cat config.json | jq '.server.port'
kubectl get pod my-pod -o json | jq '.status.phase'

DevOps Tip: 스크립트에서 JSON 데이터를 파싱하고 조작하는 데 매우 강력합니다.

`sed / awk`: 텍스트 스트림 편집 및 처리.

sed 's/old_text/new_text/g' file.txt
awk '{print $1, $3}' access.log

DevOps Tip: 로그 분석 및 데이터 추출을 위한 강력한 도구입니다. 정규 표현식과 함께 사용하면 더욱 강력합니다.

`cron`: 작업 스케줄링.

# 매일 새벽 1시에 스크립트 실행
0 1 * * * /path/to/my/script.sh

DevOps Tip: 반복적인 유지보수 작업이나 백업 스크립트를 자동화하는 데 사용됩니다.

명령어 요약

명령어목적범주
git 버전 관리, CI 트리거 CI/CD 파이프라인 관리
ssh 안전한 원격 실행, 파일 전송 CI/CD 파이프라인 관리
rsync 효율적인 파일 동기화 CI/CD 파이프라인 관리
find & xargs 파일 검색 및 명령 실행 CI/CD 파이프라인 관리
kubectl 쿠버네티스 제어 도구 컨테이너 오케스트레이션
docker 컨테이너 런타임 컨테이너 오케스트레이션
crictl CRI (Container Runtime Interface) 도구 컨테이너 오케스트레이션
ip 네트워크 설정 및 통계 관리 네트워크 문제 해결
lsof List Open Files (네트워크 소켓 포함) 네트워크 문제 해결
dig / nslookup DNS 쿼리 유틸리티 네트워크 문제 해결
curl / wget 데이터 전송 도구 네트워크 문제 해결
jq JSON 프로세서 인프라 자동화 스크립팅
sed / awk 텍스트 스트림 편집 및 처리 인프라 자동화 스크립팅
cron 작업 스케줄링 인프라 자동화 스크립팅
메타데이터

Tistory Tags:

데브옵스리눅스명령어CI/CD쿠버네티스컨테이너네트워크디버깅자동화쉘스크립트시스템관리인프라자동화

Search Summary:

데브옵스 엔지니어 필수 리눅스 명령어 마스터! CI/CD, Kubernetes, 네트워크 디버깅, 인프라 자동화 등 실용 예시 및 팁을 제공합니다.


DevOps Engineer's Essential Linux Command Set: A Wiki Guide to EfficiencyEN

Mastering core Linux commands is crucial for DevOps engineers to achieve operational prowess. This guide covers essential commands for CI/CD Pipeline Management, Container Orchestration, Network Debugging, and Real-time Monitoring & Log Analysis.

CI/CD Pipeline Management

`git`: Version control, CI trigger.

git clone <repo-url>
git pull origin main
git commit -m "feat: add new feature"
git push origin main

DevOps Tip: Automate `git pull` in your CI pipeline for fresh code. Use specific branch tags for releases.

`ssh`: Secure remote execution, file transfer.

ssh user@host "ls -la /var/www/html"
scp /local/path/file user@host:/remote/path/

DevOps Tip: Use SSH keys for passwordless authentication in automated scripts.

`rsync`: Efficient file synchronization.

rsync -avz /local/dir/ user@host:/remote/dir/

DevOps Tip: `rsync` with `--delete` option can be used for deployment artifact cleanup.

`find & xargs`: File search and command execution.

find . -name "*.log" | xargs rm

DevOps Tip: Great for bulk operations on files, like compressing old logs or deleting temporary files.

Container Orchestration with Kubernetes

`kubectl`: Kubernetes control tool.

kubectl get pods
kubectl apply -f deployment.yaml
kubectl logs <pod-name> -f

DevOps Tip: Use `kubectl describe` for detailed resource information during debugging.

`docker`: Container runtime.

docker build -t myapp:1.0 .
docker run -d -p 80:80 myapp:1.0
docker ps -a

DevOps Tip: Learn Docker Compose for multi-container local development.

`helm`: Kubernetes package manager.

helm install my-release stable/nginx
helm upgrade my-release -f values.yaml stable/nginx
helm uninstall my-release

DevOps Tip: Helm charts provide reproducible deployments across environments.

Network Debugging & Diagnostics

`ss`: Socket statistics (netstat replacement).

ss -tunap
ss -ltn 'sport = :80'

DevOps Tip: `ss` is faster and more powerful than `netstat` for modern Linux systems.

`tcpdump`: Packet analyzer.

tcpdump -i eth0 port 80
tcpdump -i any host 192.168.1.100

DevOps Tip: Use `tcpdump` to verify network traffic and pinpoint connectivity issues.

`dig`: Domain Information Groper (DNS lookup).

dig example.com A
dig @8.8.8.8 google.com MX

DevOps Tip: Essential for diagnosing DNS resolution problems in distributed systems.

`curl / wget`: Data transfer tools.

curl -I https://google.com
wget -O index.html https://example.com/

DevOps Tip: Use `curl -v` for verbose output to debug HTTP requests and responses.

Real-time Monitoring & Log Analysis

`top / htop`: Process monitoring.

top
htop # more user-friendly version of top

DevOps Tip: `htop` provides a better interactive interface for process management.

`journalctl`: Systemd journal client.

journalctl -u nginx.service -f
journalctl --since "2 hours ago"

DevOps Tip: Use `journalctl` for centralized logging across systemd services.

`tail`: Output the last part of files (log monitoring).

tail -f /var/log/syslog
tail -n 100 access.log | grep ERROR

DevOps Tip: `tail -f` is indispensable for real-time log monitoring during deployments or debugging.

`grep / sed / awk`: Text processing superpowers.

grep "ERROR" app.log
sed 's/old_text/new_text/g' file.txt
awk '{print $1, $3}' access.log

DevOps Tip: Master these three for powerful log analysis and data extraction.

Command Summary

CommandPurposeCategory
git Version control, CI trigger CI/CD Pipeline Management
ssh Secure remote execution, file transfer CI/CD Pipeline Management
rsync Efficient file synchronization CI/CD Pipeline Management
find & xargs File search and command execution CI/CD Pipeline Management
kubectl Kubernetes control tool Container Orchestration with Kubernetes
docker Container runtime Container Orchestration with Kubernetes
helm Kubernetes package manager Container Orchestration with Kubernetes
ss Socket statistics (netstat replacement) Network Debugging & Diagnostics
tcpdump Packet analyzer Network Debugging & Diagnostics
dig Domain Information Groper (DNS lookup) Network Debugging & Diagnostics
curl / wget Data transfer tools Network Debugging & Diagnostics
top / htop Process monitoring Real-time Monitoring & Log Analysis
journalctl Systemd journal client Real-time Monitoring & Log Analysis
tail Output the last part of files (log monitoring) Real-time Monitoring & Log Analysis
grep / sed / awk Text processing superpowers Real-time Monitoring & Log Analysis
Metadata

Tistory Tags:

DevOpsLinuxCommandsCI/CDKubernetesContainerizationNetworkDebuggingMonitoringShellScriptingInfrastructureAsCodeSystemd

Search Summary:

Master essential Linux commands for DevOps! This wiki-guide covers CI/CD, Kubernetes, network debugging, and real-time monitoring with practical examples & tips.


Linux Commands Frequently Used by DevOps Engineers


Table of Contents

  1. Overview
  2. System Information
  3. File and Directory Management
  4. Text Processing
  5. Process Management
  6. Networking
  7. User and Permission Management
  8. Disk and Storage
  9. Compression and Archiving

1. Overview

This document is a reference guide for Linux commands frequently used by DevOps engineers in server management, deployment, and monitoring tasks.
Commands are categorized by task type, with options and examples for immediate practical use.
This guide targets entry to intermediate level DevOps engineers who need quick reference material.

Chapters by Task Type

Chapter Description
System Information Query basic system information such as hostname, kernel version, and uptime. Used as the first step in troubleshooting and status checks.
File and Directory Management Create, copy, move, delete, and search files/directories. Essential for deployment scripts and daily server maintenance.
Text Processing Process text-based tasks including log analysis, config file editing, and data extraction. Powerful automation through pipeline combinations.
Process Management Query, terminate running processes, and control system services. Core commands for resource monitoring and incident response.
Networking Check network connectivity, download files, and test APIs. Essential for infrastructure configuration and debugging.
User and Permission Management Manage user accounts and file permissions. Used for security policy enforcement and access control.
Disk and Storage Check disk capacity, mount status, and partition information. Used for storage management and capacity monitoring.
Compression and Archiving Compress, decompress, and create archives. Used for backup and deployment package creation.

2. System Information

Commands for querying basic system status and information.
These are typically the first commands run during incident response, environment verification, and documentation.

Command List

Command Function
hostname Check or set system hostname
uname Display kernel and system information
uptime Check system uptime and load
date Check or set system date/time
whoami Display current logged-in user
id Display user UID/GID information

hostname

Check or set the system hostname.

Key Options

Option Description
-f Display FQDN (Fully Qualified Domain Name)
-i Display host IP address
-s Display short hostname

Examples

# Check current hostname
hostname

# Check FQDN
hostname -f

# Check IP address
hostname -i

↑ Back to Table of Contents


uname

Display kernel version, architecture, and other system information.

Key Options

Option Description
-a Display all system information
-r Display kernel release version
-m Display hardware architecture
-n Display network node hostname

Examples

# Display all system information
uname -a

# Check kernel version only
uname -r

# Check architecture (x86_64, arm64, etc.)
uname -m

↑ Back to Table of Contents


uptime

Check system uptime, logged-in users, and system load.

Key Options

Option Description
-p Display uptime in human-readable format
-s Display system start time

Examples

# Default output (uptime, users, load average)
uptime

# Human-readable uptime format
uptime -p

# Check system start time
uptime -s

↑ Back to Table of Contents


date

Check or set the system date and time.

Key Options

Option Description
+FORMAT Output in specified format
-u Display UTC time
-d STRING Parse specified date/time string

Common Formats

Format Example Output
+%Y-%m-%d 2024-01-15
+%H:%M:%S 14:30:25
+%Y%m%d_%H%M%S 20240115_143025

Examples

# Check current date/time
date

# Output in ISO format
date +%Y-%m-%d

# Timestamp for log filenames
date +%Y%m%d_%H%M%S

# Check UTC time
date -u

# Calculate date (7 days ago)
date -d "7 days ago" +%Y-%m-%d

↑ Back to Table of Contents


whoami

Display the current logged-in username.

Examples

# Check current user
whoami

↑ Back to Table of Contents


id

Display UID, GID, and group information for current or specified user.

Key Options

Option Description
-u Display UID only
-g Display primary GID only
-G Display all group IDs
-n Display names instead of numbers

Examples

# Full information for current user
id

# Check specific user information
id username

# Check UID only
id -u

# Check group names
id -nG

↑ Back to Table of Contents


3. File and Directory Management

Perform basic filesystem operations including create, copy, move, delete, and search files and directories.
Most frequently used commands in deployment scripts, backup tasks, and daily server management.

Command List

Command Function
ls List directory contents
cd Change directory
pwd Print working directory path
mkdir Create directory
rm Remove files/directories
cp Copy files/directories
mv Move or rename files/directories
find Search for files/directories
ln Create links (hard/symbolic)
touch Create empty file or update timestamp

ls

List directory contents.

Key Options

Option Description
-l Long format (permissions, owner, size, date)
-a Show all including hidden files
-h Human-readable file sizes
-R Recursive listing of subdirectories
-t Sort by modification time
-S Sort by file size

Examples

# Long format listing
ls -l

# Include hidden files with readable sizes
ls -lah

# Sort by modification time
ls -lt

# List specific pattern files
ls -l *.log

↑ Back to Table of Contents


cd

Change the working directory.

Examples

# Go to home directory
cd ~
cd

# Go to parent directory
cd ..

# Go to absolute path
cd /var/log

# Go to previous directory
cd -

↑ Back to Table of Contents


pwd

Print the absolute path of the current working directory.

Key Options

Option Description
-P Print physical path (resolve symlinks)
-L Print logical path (default)

Examples

# Check current path
pwd

# Physical path (resolve symlinks)
pwd -P

↑ Back to Table of Contents


mkdir

Create new directories.

Key Options

Option Description
-p Create parent directories as needed
-m MODE Set permissions on creation
-v Verbose output

Examples

# Create single directory
mkdir logs

# Create nested directories at once
mkdir -p /app/logs/2024/01

# Create with specific permissions
mkdir -m 755 scripts

↑ Back to Table of Contents


rm

Remove files or directories.

Key Options

Option Description
-r Recursive removal for directories
-f Force removal (no confirmation)
-i Prompt before removal
-v Verbose output

Examples

# Remove file
rm file.txt

# Remove directory and all contents
rm -rf directory/

# Prompt before removal
rm -i important.txt

# Remove files matching pattern
rm -f *.tmp

⚠️ Warning: rm -rf / or critical paths are unrecoverable

↑ Back to Table of Contents


cp

Copy files or directories.

Key Options

Option Description
-r Recursive copy for directories
-p Preserve permissions, ownership, timestamps
-a Archive mode (-rp + preserve symlinks)
-v Verbose output
-i Prompt before overwrite

Examples

# Copy file
cp source.txt dest.txt

# Copy directory
cp -r source_dir/ dest_dir/

# Copy preserving attributes
cp -a /var/www/ /backup/www/

# Copy multiple files to directory
cp file1.txt file2.txt dest_dir/

↑ Back to Table of Contents


mv

Move or rename files and directories.

Key Options

Option Description
-i Prompt before overwrite
-f Force move (no confirmation)
-v Verbose output
-n Do not overwrite existing files

Examples

# Rename file
mv old_name.txt new_name.txt

# Move file
mv file.txt /path/to/destination/

# Move directory
mv source_dir/ /new/location/

# Move multiple files
mv *.log /var/log/archive/

↑ Back to Table of Contents


find

Search for files and directories matching conditions.

Key Options

Option Description
-name PATTERN Search by filename pattern
-type f/d Specify file(f) or directory(d)
-mtime +/-N Search by modification time (days)
-size +/-N Search by file size
-exec CMD {} \; Execute command on results
-perm MODE Search by permissions

Examples

# Search by name
find /var/log -name "*.log"

# Find files older than 7 days
find /tmp -type f -mtime +7

# Find files larger than 100MB
find / -type f -size +100M

# Search and delete
find /tmp -name "*.tmp" -exec rm {} \;

# Find empty directories
find /app -type d -empty

# Find files with 777 permissions
find / -type f -perm 0777

↑ Back to Table of Contents


ln

Create links to files.

Key Options

Option Description
-s Create symbolic link
-f Overwrite existing link
-v Verbose output

Examples

# Create symbolic link
ln -s /path/to/original /path/to/link

# Symbolic link for config file
ln -s /etc/nginx/sites-available/mysite /etc/nginx/sites-enabled/

# Create hard link
ln original.txt hardlink.txt

# Replace existing link
ln -sf /new/target /path/to/link

↑ Back to Table of Contents


touch

Create empty files or update existing file timestamps.

Key Options

Option Description
-a Change access time only
-m Change modification time only
-t STAMP Set specific timestamp
-d STRING Set time from date string

Examples

# Create empty file
touch newfile.txt

# Create multiple files
touch file1.txt file2.txt file3.txt

# Update timestamp
touch existing_file.txt

# Set specific date
touch -d "2024-01-01 00:00:00" file.txt

↑ Back to Table of Contents


4. Text Processing

Process text-based tasks including log file analysis, config file editing, and data extraction/transformation.
Powerful data processing automation is possible through pipeline (|) combinations.

Command List

Command Function
cat Display file contents
head Display beginning of file
tail Display end of file
grep Pattern search
awk Text processing and data extraction
sed Stream editor
cut Extract fields
sort Sort lines
uniq Remove duplicates
wc Count lines/words/characters

cat

Display file contents or concatenate files.

Key Options

Option Description
-n Number all output lines
-b Number non-empty lines only
-s Squeeze multiple blank lines
-A Show all control characters

Examples

# Display file contents
cat file.txt

# Display with line numbers
cat -n file.txt

# Concatenate files
cat file1.txt file2.txt > combined.txt

# Append to file
cat newdata.txt >> existing.txt

↑ Back to Table of Contents


head

Display the beginning of a file. Default is 10 lines.

Key Options

Option Description
-n N Display first N lines
-c N Display first N bytes

Examples

# Display first 10 lines
head file.txt

# Display first 20 lines
head -n 20 file.txt

# Display first 100 bytes
head -c 100 file.txt

↑ Back to Table of Contents


tail

Display the end of a file. Essential for log monitoring.

Key Options

Option Description
-n N Display last N lines
-f Follow file changes in real-time
-F Follow + detect file recreation
-c N Display last N bytes

Examples

# Display last 10 lines
tail file.txt

# Display last 50 lines
tail -n 50 file.txt

# Real-time log monitoring
tail -f /var/log/syslog

# Monitor with log rotation support
tail -F /var/log/nginx/access.log

# Monitor multiple files
tail -f /var/log/*.log

↑ Back to Table of Contents


grep

Search for patterns in files.

Key Options

Option Description
-i Case-insensitive search
-r Recursive directory search
-n Display line numbers
-v Invert match (non-matching lines)
-c Count matching lines
-l Display only filenames with matches
-E Extended regular expressions
-A N Display N lines after match
-B N Display N lines before match

Examples

# Basic search
grep "error" /var/log/syslog

# Case-insensitive
grep -i "error" logfile.txt

# Recursive search in directory
grep -r "TODO" /app/src/

# Display with line numbers
grep -n "failed" app.log

# Exclude pattern
grep -v "DEBUG" app.log

# Multiple patterns
grep -E "error|warning|critical" app.log

# Display context (3 lines before and after)
grep -B 3 -A 3 "Exception" app.log

↑ Back to Table of Contents


awk

Process text field by field and extract data.

Basic Syntax

awk 'pattern { action }' file

Key Built-in Variables

Variable Description
$0 Entire line
$1, $2, ... 1st, 2nd, ... field
NF Number of fields
NR Current line number
FS Field separator

Examples

# Print specific fields
awk '{print $1, $3}' file.txt

# Specify field separator
awk -F: '{print $1}' /etc/passwd

# Conditional printing
awk '$3 > 100 {print $1, $3}' data.txt

# Print line numbers
awk '{print NR, $0}' file.txt

# Calculate sum
awk '{sum += $1} END {print sum}' numbers.txt

# Process lines matching pattern
awk '/error/ {print $0}' logfile.txt

# Print last field
awk '{print $NF}' file.txt

↑ Back to Table of Contents


sed

Stream editor for text substitution and transformation.

Basic Syntax

sed 's/pattern/replacement/flags' file

Key Options

Option Description
-i Edit file in-place
-e Execute multiple commands
-n Suppress automatic output
g Global replacement (flag)

Examples

# String substitution (first occurrence)
sed 's/old/new/' file.txt

# Global substitution
sed 's/old/new/g' file.txt

# Edit file in-place
sed -i 's/old/new/g' file.txt

# Delete specific line
sed '5d' file.txt

# Delete empty lines
sed '/^$/d' file.txt

# Print specific lines only
sed -n '10,20p' file.txt

# Multiple substitution commands
sed -e 's/foo/bar/g' -e 's/baz/qux/g' file.txt

↑ Back to Table of Contents


cut

Extract specific fields or character ranges from lines.

Key Options

Option Description
-d DELIM Specify field delimiter
-f N Extract Nth field
-c N-M Extract character positions N to M

Examples

# Extract first field (colon-delimited)
cut -d: -f1 /etc/passwd

# Extract multiple fields
cut -d, -f1,3,5 data.csv

# Extract by character position
cut -c1-10 file.txt

# Tab-delimited file (default)
cut -f2 data.tsv

↑ Back to Table of Contents


sort

Sort lines.

Key Options

Option Description
-n Numeric sort
-r Reverse sort
-k N Sort by Nth field
-t DELIM Specify field delimiter
-u Remove duplicates after sort

Examples

# Alphabetical sort
sort file.txt

# Numeric sort
sort -n numbers.txt

# Reverse sort
sort -r file.txt

# Sort by 2nd field
sort -t: -k2 data.txt

# Sort and remove duplicates
sort -u file.txt

# Sort by file size (ls output)
ls -l | sort -k5 -n

↑ Back to Table of Contents


uniq

Remove consecutive duplicate lines. Usually used with sort.

Key Options

Option Description
-c Display count of occurrences
-d Display only duplicated lines
-u Display only unique lines
-i Case-insensitive comparison

Examples

# Remove duplicates (requires sorted input)
sort file.txt | uniq

# Count occurrences
sort file.txt | uniq -c

# Show only duplicated lines
sort file.txt | uniq -d

# Sort by count
sort file.txt | uniq -c | sort -rn

↑ Back to Table of Contents


wc

Count lines, words, and characters in files.

Key Options

Option Description
-l Line count
-w Word count
-c Byte count
-m Character count

Examples

# Full statistics
wc file.txt

# Line count only
wc -l file.txt

# Multiple file statistics
wc -l *.log

# Use with pipe
cat file.txt | grep "error" | wc -l

↑ Back to Table of Contents


5. Process Management

Query running processes, monitor, terminate, and control system services.
Core commands for system resource management and incident response.

Command List

Command Function
ps Display process status
top Real-time process monitoring
htop Enhanced process monitoring
kill Terminate process
pkill Terminate process by name
systemctl Manage system services
journalctl Query system logs
nohup Run process immune to hangups

ps

Display information about running processes.

Key Options

Option Description
aux Detailed output of all processes
-ef Full format of all processes
-u USER Specific user's processes
--forest Tree view

Examples

# Display all processes
ps aux

# Full format output
ps -ef

# Search specific process
ps aux | grep nginx

# Process tree view
ps aux --forest

# Specific user's processes
ps -u www-data

# Top CPU-consuming processes
ps aux --sort=-%cpu | head -10

# Top memory-consuming processes
ps aux --sort=-%mem | head -10

↑ Back to Table of Contents


top

Monitor system status and processes in real-time.

Runtime Shortcuts

Key Function
q Quit
k Kill process
M Sort by memory usage
P Sort by CPU usage
1 Show per-CPU stats
c Show full command path

Key Options

Option Description
-d N Refresh interval N seconds
-u USER Specific user's processes only
-p PID Monitor specific PID
-b Batch mode (for file output)

Examples

# Default execution
top

# 2-second refresh interval
top -d 2

# Specific user's processes only
top -u nginx

# Batch mode for file output
top -b -n 1 > top_output.txt

↑ Back to Table of Contents


htop

Enhanced version of top. Colorful interface with mouse support.

Runtime Shortcuts

Key Function
F5 Tree view
F6 Select sort column
F9 Kill process
F10 Quit
/ Search
\ Filter

Examples

# Default execution
htop

# Specific user's processes only
htop -u nginx

# Start with tree view
htop -t

↑ Back to Table of Contents


kill

Send signals to processes to terminate them.

Key Signals

Signal Number Description
SIGTERM 15 Graceful termination request (default)
SIGKILL 9 Force termination
SIGHUP 1 Restart/reload configuration
SIGSTOP 19 Pause process

Examples

# Graceful termination request
kill 1234

# Force termination
kill -9 1234
kill -SIGKILL 1234

# Terminate multiple processes
kill 1234 5678 9012

# Reload configuration (nginx, etc.)
kill -HUP 1234

↑ Back to Table of Contents


pkill

Terminate processes by name or conditions.

Key Options

Option Description
-f Search in full command line
-u USER Specific user's processes
-signal Specify signal to send

Examples

# Terminate by name
pkill nginx

# Force termination
pkill -9 nginx

# Search in full command
pkill -f "python app.py"

# Terminate specific user's processes
pkill -u www-data

↑ Back to Table of Contents


systemctl

Manage systemd-based services.

Key Commands

Command Description
start Start service
stop Stop service
restart Restart service
reload Reload configuration
status Check service status
enable Enable auto-start on boot
disable Disable auto-start on boot

Examples

# Check service status
systemctl status nginx

# Start service
sudo systemctl start nginx

# Stop service
sudo systemctl stop nginx

# Restart service
sudo systemctl restart nginx

# Reload configuration (without restart)
sudo systemctl reload nginx

# Enable auto-start on boot
sudo systemctl enable nginx

# List all services
systemctl list-units --type=service

# List failed services
systemctl --failed

↑ Back to Table of Contents


journalctl

Query systemd journal logs.

Key Options

Option Description
-u UNIT Specific service logs
-f Follow logs in real-time
-n N Show last N lines
--since Logs since specific time
-p LEVEL Filter by log level
-b Logs since current boot

Examples

# View all logs
journalctl

# Specific service logs
journalctl -u nginx

# Follow logs in real-time
journalctl -f -u nginx

# Last 100 lines
journalctl -n 100

# Today's logs only
journalctl --since today

# Error level and above only
journalctl -p err

# Specific time range
journalctl --since "2024-01-01" --until "2024-01-02"

↑ Back to Table of Contents


nohup

Run processes that continue after terminal closes.

Examples

# Run in background
nohup ./script.sh &

# Specify output file
nohup ./script.sh > output.log 2>&1 &

# Discard output
nohup ./script.sh > /dev/null 2>&1 &

↑ Back to Table of Contents


6. Networking

Perform network-related tasks including connectivity checks, file downloads, and API testing.
Essential commands for infrastructure configuration, troubleshooting, and external service integration.

Command List

Command Function
ping Test network connectivity
curl Transfer data via URL and API testing
wget Download files
ss Socket statistics
netstat Network connection status
ip IP address and routing management
dig DNS lookup
nslookup DNS lookup (simple)
traceroute Trace network path
scp Copy files via SSH
rsync File synchronization

ping

Send ICMP packets to test network connectivity.

Key Options

Option Description
-c N Stop after N packets
-i N Send interval N seconds
-W N Timeout N seconds
-s SIZE Specify packet size

Examples

# Basic ping
ping google.com

# Send 4 packets only
ping -c 4 google.com

# 1 second timeout
ping -c 4 -W 1 192.168.1.1

↑ Back to Table of Contents


curl

Transfer data via URLs. Essential for API testing.

Key Options

Option Description
-X METHOD Specify HTTP method
-H HEADER Add header
-d DATA POST data
-o FILE Output to file
-O Save with remote filename
-L Follow redirects
-s Silent mode
-v Verbose output
-I Headers only
-k Skip SSL certificate verification

Examples

# GET request
curl https://api.example.com/users

# POST request (JSON)
curl -X POST https://api.example.com/users \
  -H "Content-Type: application/json" \
  -d '{"name": "John", "email": "john@example.com"}'

# Check headers
curl -I https://example.com

# Download file
curl -O https://example.com/file.tar.gz

# Include auth token
curl -H "Authorization: Bearer TOKEN" https://api.example.com/data

# Verbose debug
curl -v https://example.com

# Output HTTP status code only
curl -s -o /dev/null -w "%{http_code}" https://example.com

↑ Back to Table of Contents


wget

Download files from URLs.

Key Options

Option Description
-O FILE Specify output filename
-q Quiet mode
-c Resume download
-r Recursive download
-P DIR Specify download directory
--limit-rate Limit download speed

Examples

# Basic download
wget https://example.com/file.tar.gz

# Specify filename
wget -O myfile.tar.gz https://example.com/file.tar.gz

# Resume download
wget -c https://example.com/largefile.iso

# Background download
wget -b https://example.com/file.tar.gz

# Limit speed
wget --limit-rate=1m https://example.com/file.tar.gz

↑ Back to Table of Contents


ss

Display socket statistics. Modern replacement for netstat.

Key Options

Option Description
-t TCP sockets
-u UDP sockets
-l Listening sockets
-n Numeric output (no DNS lookup)
-p Show process information
-a All sockets

Examples

# Listening TCP ports
ss -tlnp

# All TCP connections
ss -tan

# Check specific port
ss -tlnp | grep :80

# ESTABLISHED connections
ss -t state established

# Connections by process
ss -tp

↑ Back to Table of Contents


netstat

Display network connections, routing tables, and interface statistics.

Key Options

Option Description
-t TCP connections
-u UDP connections
-l Listening state
-n Numeric output
-p Process information
-r Routing table

Examples

# Check listening ports
netstat -tlnp

# All connections
netstat -an

# Routing table
netstat -r

# Interface statistics
netstat -i

↑ Back to Table of Contents


ip

Manage IP addresses, routing, and network interfaces.

Key Subcommands

Command Description
ip addr IP address management
ip link Network interface management
ip route Routing table management
ip neigh ARP table query

Examples

# Check IP addresses
ip addr
ip a

# Specific interface
ip addr show eth0

# Routing table
ip route
ip r

# Check default gateway
ip route | grep default

# Enable/disable interface
sudo ip link set eth0 up
sudo ip link set eth0 down

# Add IP address
sudo ip addr add 192.168.1.100/24 dev eth0

↑ Back to Table of Contents


dig

Query DNS records in detail.

Key Options

Option Description
+short Brief output
-t TYPE Specify record type
@SERVER Specify DNS server

Examples

# A record query
dig example.com

# Brief output
dig +short example.com

# MX record
dig -t MX example.com

# NS record
dig -t NS example.com

# Query specific DNS server
dig @8.8.8.8 example.com

# Reverse lookup
dig -x 8.8.8.8

↑ Back to Table of Contents


nslookup

Perform simple DNS lookups.

Examples

# Basic lookup
nslookup example.com

# Use specific DNS server
nslookup example.com 8.8.8.8

# Reverse lookup
nslookup 8.8.8.8

↑ Back to Table of Contents


traceroute

Trace the network path to a destination.

Key Options

Option Description
-n No DNS lookup
-m N Maximum hops
-w N Timeout seconds

Examples

# Basic trace
traceroute google.com

# Without DNS lookup
traceroute -n google.com

# Maximum 15 hops
traceroute -m 15 google.com

↑ Back to Table of Contents


scp

Copy files between hosts via SSH.

Key Options

Option Description
-r Recursive copy for directories
-P PORT Specify SSH port
-i KEY Specify SSH key file
-v Verbose output

Examples

# Local → Remote
scp file.txt user@server:/path/to/dest/

# Remote → Local
scp user@server:/path/to/file.txt ./

# Copy directory
scp -r mydir/ user@server:/path/to/dest/

# Specify port
scp -P 2222 file.txt user@server:/path/

# Use key file
scp -i ~/.ssh/mykey.pem file.txt user@server:/path/

↑ Back to Table of Contents


rsync

Efficiently synchronize files. Transfers only changed parts.

Key Options

Option Description
-a Archive mode (preserve permissions, times)
-v Verbose output
-z Compress during transfer
--delete Delete files not in source
--dry-run Test run
-e Specify remote shell
--progress Show progress

Examples

# Local synchronization
rsync -av source/ dest/

# Sync to remote server
rsync -avz source/ user@server:/path/to/dest/

# Sync from remote to local
rsync -avz user@server:/path/to/source/ ./dest/

# Full sync with deletion
rsync -av --delete source/ dest/

# Test run
rsync -av --dry-run source/ dest/

# Specify SSH port
rsync -avz -e "ssh -p 2222" source/ user@server:/path/

# Show progress
rsync -av --progress source/ dest/

↑ Back to Table of Contents


7. User and Permission Management

Manage user accounts and file/directory permissions for access control.
Essential commands for security policy enforcement and system administration.

Command List

Command Function
chmod Change file permissions
chown Change file ownership
useradd Create user
usermod Modify user
userdel Delete user
passwd Change password
sudo Execute with admin privileges
su Switch user
groups Check group membership

chmod

Change file or directory permissions.

Permission Notation

Symbol Meaning
r (4) Read
w (2) Write
x (1) Execute
u Owner
g Group
o Others
a All

Key Options

Option Description
-R Recursive
-v Verbose

Examples

# Numeric mode
chmod 755 script.sh    # rwxr-xr-x
chmod 644 file.txt     # rw-r--r--
chmod 600 secret.key   # rw-------

# Symbolic mode
chmod +x script.sh     # Add execute permission
chmod u+w file.txt     # Add owner write permission
chmod go-rwx file.txt  # Remove all permissions for group/others

# Recursive for directory
chmod -R 755 /var/www/

# Directories 755, files 644
find /var/www -type d -exec chmod 755 {} \;
find /var/www -type f -exec chmod 644 {} \;

↑ Back to Table of Contents


chown

Change file or directory ownership and group.

Key Options

Option Description
-R Recursive
-v Verbose

Examples

# Change owner
sudo chown user file.txt

# Change owner and group
sudo chown user:group file.txt

# Change group only
sudo chown :group file.txt

# Recursive
sudo chown -R www-data:www-data /var/www/

↑ Back to Table of Contents


useradd

Create a new user account.

Key Options

Option Description
-m Create home directory
-s SHELL Specify default shell
-g GROUP Specify primary group
-G GROUPS Specify supplementary groups
-d DIR Specify home directory path

Examples

# Create basic user
sudo useradd username

# Create with home directory
sudo useradd -m username

# Specify shell and groups
sudo useradd -m -s /bin/bash -G sudo,docker username

# Create system user (for services)
sudo useradd -r -s /usr/sbin/nologin serviceuser

↑ Back to Table of Contents


usermod

Modify existing user account.

Key Options

Option Description
-aG GROUP Add to group
-s SHELL Change shell
-L Lock account
-U Unlock account
-l NAME Change username

Examples

# Add to group
sudo usermod -aG docker username
sudo usermod -aG sudo username

# Change shell
sudo usermod -s /bin/zsh username

# Lock account
sudo usermod -L username

# Unlock account
sudo usermod -U username

↑ Back to Table of Contents


userdel

Delete a user account.

Key Options

Option Description
-r Remove home directory and mail spool
-f Force deletion

Examples

# Delete user only
sudo userdel username

# Delete including home directory
sudo userdel -r username

↑ Back to Table of Contents


passwd

Set or change user password.

Key Options

Option Description
-l Lock account
-u Unlock account
-d Delete password
-e Expire password (force change on next login)

Examples

# Change own password
passwd

# Change another user's password (root)
sudo passwd username

# Force password change on next login
sudo passwd -e username

↑ Back to Table of Contents


sudo

Execute commands with another user's privileges (typically root).

Key Options

Option Description
-u USER Execute as specific user
-i Start login shell
-s Start shell
-l List allowed commands

Examples

# Execute with root privileges
sudo apt update

# Start root shell
sudo -i

# Execute as specific user
sudo -u www-data whoami

# Check allowed commands
sudo -l

↑ Back to Table of Contents


su

Switch to another user.

Key Options

Option Description
- Login shell
-c CMD Execute command and return

Examples

# Switch to root
su -

# Switch to specific user
su - username

# Execute command and return
su -c "whoami" username

↑ Back to Table of Contents


groups

Display group membership.

Examples

# Current user's groups
groups

# Specific user's groups
groups username

↑ Back to Table of Contents


8. Disk and Storage

Check and manage disk capacity, partitions, and mount status.
Used for storage management, capacity monitoring, and system maintenance.

Command List

Command Function
df Display disk usage
du Display directory size
lsblk List block devices
mount Mount filesystem
umount Unmount filesystem
fdisk Partition management
blkid Display block device UUID

df

Display filesystem disk usage.

Key Options

Option Description
-h Human-readable units (GB, MB)
-T Show filesystem type
-i Show inode usage

Examples

# Check disk usage
df -h

# Include filesystem type
df -hT

# Inode usage
df -i

# Specific path
df -h /var

↑ Back to Table of Contents


du

Display file and directory sizes.

Key Options

Option Description
-h Human-readable units
-s Summary only
-d N Depth N levels
--max-depth=N Maximum depth
-a Include files

Examples

# Current directory size
du -sh

# Subdirectory sizes
du -h --max-depth=1

# Find large directories
du -h --max-depth=1 | sort -hr | head -10

# Specific directory
du -sh /var/log/

# Top 10 largest files/directories
du -ah / 2>/dev/null | sort -hr | head -10

↑ Back to Table of Contents


lsblk

Display block device information in tree format.

Key Options

Option Description
-f Include filesystem information
-a Include empty devices
-o COLUMNS Specify output columns

Examples

# Basic output
lsblk

# Include filesystem information
lsblk -f

# Detailed information
lsblk -o NAME,SIZE,FSTYPE,MOUNTPOINT,UUID

↑ Back to Table of Contents


mount

Mount filesystems or check mount status.

Key Options

Option Description
-t TYPE Filesystem type
-o OPTIONS Mount options
-a Mount all entries in /etc/fstab

Examples

# Current mount status
mount

# Mount device
sudo mount /dev/sdb1 /mnt/data

# Specify type
sudo mount -t ext4 /dev/sdb1 /mnt/data

# Read-only mount
sudo mount -o ro /dev/sdb1 /mnt/data

# Mount ISO file
sudo mount -o loop image.iso /mnt/iso

# NFS mount
sudo mount -t nfs server:/share /mnt/nfs

↑ Back to Table of Contents


umount

Unmount mounted filesystems.

Key Options

Option Description
-l Lazy unmount
-f Force unmount

Examples

# Unmount
sudo umount /mnt/data

# Unmount by device name
sudo umount /dev/sdb1

# Force unmount
sudo umount -f /mnt/stuck

# Lazy unmount (even if busy)
sudo umount -l /mnt/busy

↑ Back to Table of Contents


fdisk

Manage disk partitions.

Key Options

Option Description
-l List partitions

Examples

# List all disk partitions
sudo fdisk -l

# Partition specific disk
sudo fdisk /dev/sdb
# Interactive commands: n(new), d(delete), p(print), w(write)

↑ Back to Table of Contents


blkid

Display block device UUID and filesystem information.

Examples

# All device information
sudo blkid

# Specific device
sudo blkid /dev/sda1

# UUID only
sudo blkid -s UUID -o value /dev/sda1

↑ Back to Table of Contents


9. Compression and Archiving

Compress, decompress, and create archives.
Used for backup, deployment package creation, and log archiving.

Command List

Command Function
tar Create/extract archives
gzip gzip compression/decompression
gunzip gzip decompression
zip zip compression
unzip zip extraction
zcat Display compressed file contents

tar

Archive files or compress archives.

Key Options

Option Description
-c Create archive
-x Extract archive
-v Verbose output
-f FILE Specify filename
-z gzip compression
-j bzip2 compression
-J xz compression
-t List contents
-C DIR Specify target directory

Examples

# Create tar.gz
tar -czvf archive.tar.gz directory/

# Extract tar.gz
tar -xzvf archive.tar.gz

# Extract to specific directory
tar -xzvf archive.tar.gz -C /path/to/dest/

# List contents (without extraction)
tar -tzvf archive.tar.gz

# Create tar.bz2
tar -cjvf archive.tar.bz2 directory/

# Archive specific files
tar -czvf logs.tar.gz /var/log/*.log

# Exclude specific pattern
tar -czvf backup.tar.gz --exclude='*.tmp' directory/

↑ Back to Table of Contents


gzip

Compress files with gzip. Replaces original file.

Key Options

Option Description
-d Decompress
-k Keep original file
-v Verbose output
-1~-9 Compression level (9 is maximum)

Examples

# Compress
gzip file.txt           # → file.txt.gz

# Keep original
gzip -k file.txt

# Decompress
gzip -d file.txt.gz

# Maximum compression
gzip -9 largefile.txt

↑ Back to Table of Contents


gunzip

Decompress gzip files.

Examples

# Decompress
gunzip file.txt.gz

# Keep original
gunzip -k file.txt.gz

↑ Back to Table of Contents


zip

Compress files in zip format.

Key Options

Option Description
-r Include directories recursively
-e Set password
-9 Maximum compression

Examples

# Compress files
zip archive.zip file1.txt file2.txt

# Compress directory
zip -r archive.zip directory/

# Set password
zip -e secure.zip file.txt

# Maximum compression
zip -9 -r archive.zip directory/

↑ Back to Table of Contents


unzip

Extract zip files.

Key Options

Option Description
-d DIR Specify target directory
-l List contents
-o Overwrite without prompt

Examples

# Extract
unzip archive.zip

# Extract to specific directory
unzip archive.zip -d /path/to/dest/

# List contents
unzip -l archive.zip

↑ Back to Table of Contents


zcat

Display compressed file contents without extraction.

Examples

# Display gzip file contents
zcat file.txt.gz

# Use with pipe
zcat access.log.gz | grep "404"

# Multiple files
zcat *.gz | grep "error"

↑ Back to Table of Contents


References


Last updated: 2024

DevOps 엔지니어가 자주 사용하는 Linux 명령어 세트


목차

  1. 개요
  2. 시스템 정보 확인
  3. 파일 및 디렉토리 관리
  4. 텍스트 처리
  5. 프로세스 관리
  6. 네트워크
  7. 사용자 및 권한 관리
  8. 디스크 및 스토리지
  9. 압축 및 아카이브

1. 개요

이 문서는 DevOps 엔지니어가 서버 관리, 배포, 모니터링 업무에서 자주 사용하는 Linux 명령어를 정리한 레퍼런스이다.
각 명령어는 작업 유형별로 분류하였으며, 실무에서 바로 활용할 수 있도록 옵션과 예제를 함께 제공한다.
초급부터 중급 수준의 DevOps 엔지니어가 빠르게 참조할 수 있는 실용적인 가이드를 목표로 한다.

작업 유형별 챕터

챕터 설명
시스템 정보 확인 호스트명, 커널 버전, 가동 시간 등 시스템 기본 정보를 조회한다. 서버 상태 파악 및 트러블슈팅의 첫 단계에서 활용한다.
파일 및 디렉토리 관리 파일/디렉토리의 생성, 복사, 이동, 삭제, 검색 작업을 수행한다. 배포 스크립트 작성 시 필수적으로 사용한다.
텍스트 처리 로그 분석, 설정 파일 편집, 데이터 추출 등 텍스트 기반 작업을 처리한다. 파이프라인과 조합하여 강력한 자동화가 가능하다.
프로세스 관리 실행 중인 프로세스 조회, 종료, 서비스 제어를 수행한다. 시스템 리소스 모니터링과 장애 대응에 핵심적이다.
네트워크 네트워크 연결 상태 확인, 파일 다운로드, API 테스트를 수행한다. 인프라 구성 및 디버깅에 필수적이다.
사용자 및 권한 관리 사용자 계정 관리와 파일 권한 설정을 담당한다. 보안 정책 적용과 접근 제어에 사용한다.
디스크 및 스토리지 디스크 용량, 마운트 상태, 파티션 정보를 확인한다. 스토리지 관리 및 용량 모니터링에 활용한다.
압축 및 아카이브 파일 압축, 해제, 아카이브 생성을 수행한다. 백업 및 배포 패키지 생성에 사용한다.

2. 시스템 정보 확인

서버의 기본 상태와 시스템 정보를 조회하는 명령어 모음이다.
장애 대응, 환경 확인, 문서화 작업 시 가장 먼저 실행하는 명령어들이다.

명령어 리스트

Command Function
hostname 시스템 호스트명 확인 및 설정
uname 커널 및 시스템 정보 출력
uptime 시스템 가동 시간 및 부하 확인
date 시스템 날짜/시간 확인 및 설정
whoami 현재 로그인 사용자 확인
id 사용자 UID/GID 정보 확인

hostname

시스템의 호스트명을 확인하거나 설정한다.

주요 옵션

옵션 설명
-f FQDN(Fully Qualified Domain Name) 출력
-i 호스트의 IP 주소 출력
-s 짧은 호스트명 출력

예제

# 현재 호스트명 확인
hostname

# FQDN 확인
hostname -f

# IP 주소 확인
hostname -i

↑ 목차로 돌아가기


uname

커널 버전, 아키텍처 등 시스템 정보를 출력한다.

주요 옵션

옵션 설명
-a 모든 시스템 정보 출력
-r 커널 릴리즈 버전 출력
-m 하드웨어 아키텍처 출력
-n 네트워크 노드 호스트명 출력

예제

# 모든 시스템 정보 확인
uname -a

# 커널 버전만 확인
uname -r

# 아키텍처 확인 (x86_64, arm64 등)
uname -m

↑ 목차로 돌아가기


uptime

시스템 가동 시간, 로그인 사용자 수, 시스템 부하를 확인한다.

주요 옵션

옵션 설명
-p 가동 시간을 읽기 쉬운 형태로 출력
-s 시스템 시작 시간 출력

예제

# 기본 출력 (가동시간, 사용자수, 로드 평균)
uptime

# 읽기 쉬운 형태로 가동 시간 출력
uptime -p

# 시스템 시작 시간 확인
uptime -s

↑ 목차로 돌아가기


date

시스템의 현재 날짜와 시간을 확인하거나 설정한다.

주요 옵션

옵션 설명
+FORMAT 지정한 포맷으로 출력
-u UTC 시간 출력
-d STRING 지정한 날짜/시간 문자열 파싱

자주 사용하는 포맷

포맷 출력 예시
+%Y-%m-%d 2024-01-15
+%H:%M:%S 14:30:25
+%Y%m%d_%H%M%S 20240115_143025

예제

# 현재 날짜/시간 확인
date

# ISO 형식으로 출력
date +%Y-%m-%d

# 로그 파일명용 타임스탬프
date +%Y%m%d_%H%M%S

# UTC 시간 확인
date -u

# 특정 날짜 계산 (7일 전)
date -d "7 days ago" +%Y-%m-%d

↑ 목차로 돌아가기


whoami

현재 로그인한 사용자의 이름을 출력한다.

예제

# 현재 사용자 확인
whoami

↑ 목차로 돌아가기


id

현재 사용자 또는 지정한 사용자의 UID, GID, 그룹 정보를 출력한다.

주요 옵션

옵션 설명
-u UID만 출력
-g 기본 GID만 출력
-G 모든 그룹 ID 출력
-n 숫자 대신 이름으로 출력

예제

# 현재 사용자 전체 정보
id

# 특정 사용자 정보 확인
id username

# UID만 확인
id -u

# 소속 그룹명 확인
id -nG

↑ 목차로 돌아가기


3. 파일 및 디렉토리 관리

파일과 디렉토리의 생성, 복사, 이동, 삭제, 검색 등 기본적인 파일 시스템 작업을 수행한다.
배포 스크립트, 백업 작업, 일상적인 서버 관리에서 가장 빈번하게 사용하는 명령어들이다.

명령어 리스트

Command Function
ls 디렉토리 내용 목록 출력
cd 디렉토리 이동
pwd 현재 작업 디렉토리 경로 출력
mkdir 디렉토리 생성
rm 파일/디렉토리 삭제
cp 파일/디렉토리 복사
mv 파일/디렉토리 이동 또는 이름 변경
find 파일/디렉토리 검색
ln 링크 생성 (하드링크/심볼릭링크)
touch 빈 파일 생성 또는 타임스탬프 갱신

ls

디렉토리의 내용을 목록으로 출력한다.

주요 옵션

옵션 설명
-l 상세 정보 출력 (권한, 소유자, 크기, 날짜)
-a 숨김 파일 포함 전체 출력
-h 파일 크기를 읽기 쉬운 단위로 출력
-R 하위 디렉토리 재귀적 출력
-t 수정 시간순 정렬
-S 파일 크기순 정렬

예제

# 상세 정보 출력
ls -l

# 숨김 파일 포함, 읽기 쉬운 크기 표시
ls -lah

# 수정 시간순 정렬
ls -lt

# 특정 패턴 파일만 출력
ls -l *.log

↑ 목차로 돌아가기


cd

작업 디렉토리를 변경한다.

예제

# 홈 디렉토리로 이동
cd ~
cd

# 상위 디렉토리로 이동
cd ..

# 절대 경로로 이동
cd /var/log

# 이전 디렉토리로 이동
cd -

↑ 목차로 돌아가기


pwd

현재 작업 디렉토리의 절대 경로를 출력한다.

주요 옵션

옵션 설명
-P 심볼릭 링크를 해석한 실제 경로 출력
-L 심볼릭 링크 경로 그대로 출력 (기본값)

예제

# 현재 경로 확인
pwd

# 심볼릭 링크 해석한 실제 경로
pwd -P

↑ 목차로 돌아가기


mkdir

새 디렉토리를 생성한다.

주요 옵션

옵션 설명
-p 상위 디렉토리까지 한 번에 생성
-m MODE 생성 시 권한 지정
-v 생성 과정 출력

예제

# 단일 디렉토리 생성
mkdir logs

# 중첩 디렉토리 한 번에 생성
mkdir -p /app/logs/2024/01

# 권한 지정하여 생성
mkdir -m 755 scripts

↑ 목차로 돌아가기


rm

파일 또는 디렉토리를 삭제한다.

주요 옵션

옵션 설명
-r 디렉토리 재귀적 삭제
-f 강제 삭제 (확인 없음)
-i 삭제 전 확인
-v 삭제 과정 출력

예제

# 파일 삭제
rm file.txt

# 디렉토리와 내용물 전체 삭제
rm -rf directory/

# 확인 후 삭제
rm -i important.txt

# 특정 패턴 파일 삭제
rm -f *.tmp

⚠️ 주의: rm -rf / 또는 중요 경로에 대한 실행 시 복구 불가

↑ 목차로 돌아가기


cp

파일 또는 디렉토리를 복사한다.

주요 옵션

옵션 설명
-r 디렉토리 재귀적 복사
-p 권한, 소유자, 타임스탬프 유지
-a 아카이브 모드 (-rp + 심볼릭링크 유지)
-v 복사 과정 출력
-i 덮어쓰기 전 확인

예제

# 파일 복사
cp source.txt dest.txt

# 디렉토리 복사
cp -r source_dir/ dest_dir/

# 속성 유지하며 복사
cp -a /var/www/ /backup/www/

# 여러 파일을 디렉토리로 복사
cp file1.txt file2.txt dest_dir/

↑ 목차로 돌아가기


mv

파일 또는 디렉토리를 이동하거나 이름을 변경한다.

주요 옵션

옵션 설명
-i 덮어쓰기 전 확인
-f 강제 이동 (확인 없음)
-v 이동 과정 출력
-n 기존 파일 덮어쓰지 않음

예제

# 파일 이름 변경
mv old_name.txt new_name.txt

# 파일 이동
mv file.txt /path/to/destination/

# 디렉토리 이동
mv source_dir/ /new/location/

# 여러 파일 이동
mv *.log /var/log/archive/

↑ 목차로 돌아가기


find

조건에 맞는 파일과 디렉토리를 검색한다.

주요 옵션

옵션 설명
-name PATTERN 파일명 패턴 검색
-type f/d 파일(f) 또는 디렉토리(d) 지정
-mtime +/-N 수정 시간 기준 검색 (일 단위)
-size +/-N 파일 크기 기준 검색
-exec CMD {} \; 검색 결과에 명령 실행
-perm MODE 권한 기준 검색

예제

# 이름으로 검색
find /var/log -name "*.log"

# 7일 이상 된 파일 검색
find /tmp -type f -mtime +7

# 100MB 이상 파일 검색
find / -type f -size +100M

# 검색 후 삭제
find /tmp -name "*.tmp" -exec rm {} \;

# 빈 디렉토리 검색
find /app -type d -empty

# 권한이 777인 파일 검색
find / -type f -perm 0777

↑ 목차로 돌아가기


ln

파일에 대한 링크를 생성한다.

주요 옵션

옵션 설명
-s 심볼릭 링크 생성
-f 기존 링크 덮어쓰기
-v 생성 과정 출력

예제

# 심볼릭 링크 생성
ln -s /path/to/original /path/to/link

# 설정 파일 심볼릭 링크
ln -s /etc/nginx/sites-available/mysite /etc/nginx/sites-enabled/

# 하드 링크 생성
ln original.txt hardlink.txt

# 기존 링크 교체
ln -sf /new/target /path/to/link

↑ 목차로 돌아가기


touch

빈 파일을 생성하거나 기존 파일의 타임스탬프를 갱신한다.

주요 옵션

옵션 설명
-a 접근 시간만 변경
-m 수정 시간만 변경
-t STAMP 특정 시간으로 설정
-d STRING 날짜 문자열로 시간 설정

예제

# 빈 파일 생성
touch newfile.txt

# 여러 파일 생성
touch file1.txt file2.txt file3.txt

# 타임스탬프 갱신
touch existing_file.txt

# 특정 날짜로 설정
touch -d "2024-01-01 00:00:00" file.txt

↑ 목차로 돌아가기


4. 텍스트 처리

로그 파일 분석, 설정 파일 편집, 데이터 추출 및 변환 등 텍스트 기반 작업을 처리한다.
파이프라인(|)과 조합하여 강력한 데이터 처리 자동화가 가능하다.

명령어 리스트

Command Function
cat 파일 내용 출력
head 파일 앞부분 출력
tail 파일 뒷부분 출력
grep 패턴 검색
awk 텍스트 처리 및 데이터 추출
sed 스트림 편집기
cut 필드 추출
sort 정렬
uniq 중복 제거
wc 라인/단어/문자 수 카운트

cat

파일 내용을 출력하거나 파일을 연결한다.

주요 옵션

옵션 설명
-n 라인 번호 출력
-b 비어있지 않은 라인에만 번호 출력
-s 연속된 빈 라인을 하나로 압축
-A 모든 제어 문자 표시

예제

# 파일 내용 출력
cat file.txt

# 라인 번호와 함께 출력
cat -n file.txt

# 여러 파일 연결
cat file1.txt file2.txt > combined.txt

# 파일 내용 추가
cat newdata.txt >> existing.txt

↑ 목차로 돌아가기


head

파일의 앞부분을 출력한다. 기본값은 10줄.

주요 옵션

옵션 설명
-n N 처음 N줄 출력
-c N 처음 N바이트 출력

예제

# 처음 10줄 출력
head file.txt

# 처음 20줄 출력
head -n 20 file.txt

# 처음 100바이트 출력
head -c 100 file.txt

↑ 목차로 돌아가기


tail

파일의 뒷부분을 출력한다. 로그 모니터링에 필수적.

주요 옵션

옵션 설명
-n N 마지막 N줄 출력
-f 파일 변경을 실시간 추적
-F 파일 변경 추적 + 파일 재생성 감지
-c N 마지막 N바이트 출력

예제

# 마지막 10줄 출력
tail file.txt

# 마지막 50줄 출력
tail -n 50 file.txt

# 실시간 로그 모니터링
tail -f /var/log/syslog

# 로그 로테이션 대응 모니터링
tail -F /var/log/nginx/access.log

# 여러 파일 동시 모니터링
tail -f /var/log/*.log

↑ 목차로 돌아가기


grep

파일에서 패턴을 검색한다.

주요 옵션

옵션 설명
-i 대소문자 구분 없이 검색
-r 디렉토리 재귀 검색
-n 라인 번호 출력
-v 패턴과 일치하지 않는 라인 출력
-c 일치하는 라인 수 출력
-l 일치하는 파일명만 출력
-E 확장 정규표현식 사용
-A N 일치 라인 이후 N줄 출력
-B N 일치 라인 이전 N줄 출력

예제

# 기본 검색
grep "error" /var/log/syslog

# 대소문자 무시
grep -i "error" logfile.txt

# 디렉토리 내 재귀 검색
grep -r "TODO" /app/src/

# 라인 번호와 함께 출력
grep -n "failed" app.log

# 에러 제외하고 출력
grep -v "DEBUG" app.log

# 여러 패턴 검색
grep -E "error|warning|critical" app.log

# 일치 라인 전후 3줄씩 출력
grep -B 3 -A 3 "Exception" app.log

↑ 목차로 돌아가기


awk

텍스트를 필드 단위로 처리하고 데이터를 추출한다.

기본 구문

awk 'pattern { action }' file

주요 내장 변수

변수 설명
$0 전체 라인
$1, $2, ... 1번째, 2번째, ... 필드
NF 필드 개수
NR 현재 라인 번호
FS 필드 구분자

예제

# 특정 필드 출력
awk '{print $1, $3}' file.txt

# 필드 구분자 지정
awk -F: '{print $1}' /etc/passwd

# 조건부 출력
awk '$3 > 100 {print $1, $3}' data.txt

# 라인 번호 출력
awk '{print NR, $0}' file.txt

# 합계 계산
awk '{sum += $1} END {print sum}' numbers.txt

# 특정 패턴 라인 처리
awk '/error/ {print $0}' logfile.txt

# 마지막 필드 출력
awk '{print $NF}' file.txt

↑ 목차로 돌아가기


sed

스트림 편집기. 텍스트 치환 및 변환에 사용한다.

기본 구문

sed 's/패턴/대체문자열/플래그' file

주요 옵션

옵션 설명
-i 파일 직접 수정
-e 여러 명령 실행
-n 자동 출력 비활성화
g 전체 치환 (플래그)

예제

# 문자열 치환 (첫 번째만)
sed 's/old/new/' file.txt

# 전체 치환
sed 's/old/new/g' file.txt

# 파일 직접 수정
sed -i 's/old/new/g' file.txt

# 특정 라인 삭제
sed '5d' file.txt

# 빈 라인 삭제
sed '/^$/d' file.txt

# 특정 라인만 출력
sed -n '10,20p' file.txt

# 여러 치환 명령
sed -e 's/foo/bar/g' -e 's/baz/qux/g' file.txt

↑ 목차로 돌아가기


cut

라인에서 특정 필드나 문자 영역을 추출한다.

주요 옵션

옵션 설명
-d DELIM 필드 구분자 지정
-f N N번째 필드 추출
-c N-M N~M 문자 위치 추출

예제

# 콜론으로 구분된 1번째 필드
cut -d: -f1 /etc/passwd

# 여러 필드 추출
cut -d, -f1,3,5 data.csv

# 문자 위치로 추출
cut -c1-10 file.txt

# 탭 구분 파일 (기본값)
cut -f2 data.tsv

↑ 목차로 돌아가기


sort

라인을 정렬한다.

주요 옵션

옵션 설명
-n 숫자로 정렬
-r 역순 정렬
-k N N번째 필드 기준 정렬
-t DELIM 필드 구분자 지정
-u 중복 제거 후 정렬

예제

# 알파벳순 정렬
sort file.txt

# 숫자순 정렬
sort -n numbers.txt

# 역순 정렬
sort -r file.txt

# 2번째 필드 기준 정렬
sort -t: -k2 data.txt

# 중복 제거 후 정렬
sort -u file.txt

# 파일 크기순 정렬 (ls 출력)
ls -l | sort -k5 -n

↑ 목차로 돌아가기


uniq

연속된 중복 라인을 제거한다. 보통 sort와 함께 사용.

주요 옵션

옵션 설명
-c 중복 횟수 출력
-d 중복된 라인만 출력
-u 중복되지 않은 라인만 출력
-i 대소문자 무시

예제

# 중복 제거 (정렬 필요)
sort file.txt | uniq

# 중복 횟수 카운트
sort file.txt | uniq -c

# 중복된 라인만 출력
sort file.txt | uniq -d

# 횟수별 정렬
sort file.txt | uniq -c | sort -rn

↑ 목차로 돌아가기


wc

파일의 라인, 단어, 문자 수를 카운트한다.

주요 옵션

옵션 설명
-l 라인 수
-w 단어 수
-c 바이트 수
-m 문자 수

예제

# 전체 통계
wc file.txt

# 라인 수만
wc -l file.txt

# 여러 파일 통계
wc -l *.log

# 파이프와 함께 사용
cat file.txt | grep "error" | wc -l

↑ 목차로 돌아가기


5. 프로세스 관리

실행 중인 프로세스 조회, 모니터링, 종료 및 시스템 서비스 제어를 수행한다.
시스템 리소스 관리와 장애 대응에 핵심적인 명령어들이다.

명령어 리스트

Command Function
ps 프로세스 상태 조회
top 실시간 프로세스 모니터링
htop 향상된 프로세스 모니터링
kill 프로세스 종료
pkill 이름으로 프로세스 종료
systemctl 시스템 서비스 관리
journalctl 시스템 로그 조회
nohup 터미널 종료 후에도 프로세스 유지

ps

현재 실행 중인 프로세스 정보를 조회한다.

주요 옵션

옵션 설명
aux 모든 프로세스 상세 출력
-ef 모든 프로세스 전체 포맷
-u USER 특정 사용자 프로세스
--forest 트리 형태로 출력

예제

# 모든 프로세스 출력
ps aux

# 전체 포맷 출력
ps -ef

# 특정 프로세스 검색
ps aux | grep nginx

# 프로세스 트리 출력
ps aux --forest

# 특정 사용자 프로세스
ps -u www-data

# CPU 사용률 상위 프로세스
ps aux --sort=-%cpu | head -10

# 메모리 사용률 상위 프로세스
ps aux --sort=-%mem | head -10

↑ 목차로 돌아가기


top

실시간으로 시스템 상태와 프로세스를 모니터링한다.

실행 중 단축키

기능
q 종료
k 프로세스 종료
M 메모리 사용률 정렬
P CPU 사용률 정렬
1 CPU 코어별 표시
c 전체 명령어 경로 표시

주요 옵션

옵션 설명
-d N 갱신 주기 N초
-u USER 특정 사용자 프로세스만
-p PID 특정 PID만 모니터링
-b 배치 모드 (파일 출력용)

예제

# 기본 실행
top

# 2초 간격 갱신
top -d 2

# 특정 사용자 프로세스만
top -u nginx

# 배치 모드로 파일 출력
top -b -n 1 > top_output.txt

↑ 목차로 돌아가기


htop

top의 향상된 버전. 컬러풀한 인터페이스와 마우스 지원.

실행 중 단축키

기능
F5 트리 뷰
F6 정렬 기준 선택
F9 프로세스 종료
F10 종료
/ 검색
\ 필터

예제

# 기본 실행
htop

# 특정 사용자 프로세스만
htop -u nginx

# 트리 뷰로 시작
htop -t

↑ 목차로 돌아가기


kill

프로세스에 시그널을 보내 종료한다.

주요 시그널

시그널 번호 설명
SIGTERM 15 정상 종료 요청 (기본값)
SIGKILL 9 강제 종료
SIGHUP 1 재시작/설정 리로드
SIGSTOP 19 프로세스 일시 정지

예제

# 정상 종료 요청
kill 1234

# 강제 종료
kill -9 1234
kill -SIGKILL 1234

# 여러 프로세스 종료
kill 1234 5678 9012

# 설정 리로드 (nginx 등)
kill -HUP 1234

↑ 목차로 돌아가기


pkill

프로세스 이름이나 조건으로 프로세스를 종료한다.

주요 옵션

옵션 설명
-f 전체 명령어 라인에서 검색
-u USER 특정 사용자 프로세스
-signal 전송할 시그널 지정

예제

# 이름으로 종료
pkill nginx

# 강제 종료
pkill -9 nginx

# 전체 명령어에서 검색
pkill -f "python app.py"

# 특정 사용자의 프로세스 종료
pkill -u www-data

↑ 목차로 돌아가기


systemctl

systemd 기반 서비스를 관리한다.

주요 명령

명령 설명
start 서비스 시작
stop 서비스 중지
restart 서비스 재시작
reload 설정 리로드
status 서비스 상태 확인
enable 부팅 시 자동 시작
disable 부팅 시 자동 시작 해제

예제

# 서비스 상태 확인
systemctl status nginx

# 서비스 시작
sudo systemctl start nginx

# 서비스 중지
sudo systemctl stop nginx

# 서비스 재시작
sudo systemctl restart nginx

# 설정 리로드 (재시작 없이)
sudo systemctl reload nginx

# 부팅 시 자동 시작 설정
sudo systemctl enable nginx

# 모든 서비스 목록
systemctl list-units --type=service

# 실패한 서비스 확인
systemctl --failed

↑ 목차로 돌아가기


journalctl

systemd 저널 로그를 조회한다.

주요 옵션

옵션 설명
-u UNIT 특정 서비스 로그
-f 실시간 로그 추적
-n N 최근 N줄 출력
--since 특정 시간 이후 로그
-p LEVEL 로그 레벨 필터
-b 현재 부팅 이후 로그

예제

# 전체 로그 조회
journalctl

# 특정 서비스 로그
journalctl -u nginx

# 실시간 로그 추적
journalctl -f -u nginx

# 최근 100줄
journalctl -n 100

# 오늘 로그만
journalctl --since today

# 에러 레벨 이상만
journalctl -p err

# 특정 시간 범위
journalctl --since "2024-01-01" --until "2024-01-02"

↑ 목차로 돌아가기


nohup

터미널 종료 후에도 프로세스가 계속 실행되도록 한다.

예제

# 백그라운드 실행
nohup ./script.sh &

# 출력 파일 지정
nohup ./script.sh > output.log 2>&1 &

# 출력 버리기
nohup ./script.sh > /dev/null 2>&1 &

↑ 목차로 돌아가기


6. 네트워크

네트워크 연결 상태 확인, 파일 다운로드, API 테스트 등 네트워크 관련 작업을 수행한다.
인프라 구성, 문제 진단, 외부 서비스 연동에 필수적인 명령어들이다.

명령어 리스트

Command Function
ping 네트워크 연결 테스트
curl URL 데이터 전송 및 API 테스트
wget 파일 다운로드
ss 소켓 통계 조회
netstat 네트워크 연결 상태 조회
ip IP 주소 및 라우팅 관리
dig DNS 조회
nslookup DNS 조회 (간단)
traceroute 네트워크 경로 추적
scp SSH를 통한 파일 복사
rsync 파일 동기화

ping

대상 호스트에 ICMP 패킷을 보내 네트워크 연결을 테스트한다.

주요 옵션

옵션 설명
-c N N번 패킷 전송 후 종료
-i N N초 간격으로 전송
-W N N초 타임아웃
-s SIZE 패킷 크기 지정

예제

# 기본 ping
ping google.com

# 4번만 전송
ping -c 4 google.com

# 1초 타임아웃
ping -c 4 -W 1 192.168.1.1

↑ 목차로 돌아가기


curl

URL을 통해 데이터를 전송하거나 받는다. API 테스트에 필수.

주요 옵션

옵션 설명
-X METHOD HTTP 메소드 지정
-H HEADER 헤더 추가
-d DATA POST 데이터
-o FILE 출력 파일 지정
-O 원격 파일명으로 저장
-L 리다이렉트 따라가기
-s 진행 상태 숨김
-v 상세 출력
-I 헤더만 출력
-k SSL 인증서 검증 무시

예제

# GET 요청
curl https://api.example.com/users

# POST 요청 (JSON)
curl -X POST https://api.example.com/users \
  -H "Content-Type: application/json" \
  -d '{"name": "John", "email": "john@example.com"}'

# 헤더 확인
curl -I https://example.com

# 파일 다운로드
curl -O https://example.com/file.tar.gz

# 인증 토큰 포함
curl -H "Authorization: Bearer TOKEN" https://api.example.com/data

# 상세 디버그
curl -v https://example.com

# 응답 코드만 출력
curl -s -o /dev/null -w "%{http_code}" https://example.com

↑ 목차로 돌아가기


wget

URL에서 파일을 다운로드한다.

주요 옵션

옵션 설명
-O FILE 출력 파일명 지정
-q 조용한 모드
-c 이어받기
-r 재귀적 다운로드
-P DIR 저장 디렉토리 지정
--limit-rate 다운로드 속도 제한

예제

# 기본 다운로드
wget https://example.com/file.tar.gz

# 파일명 지정
wget -O myfile.tar.gz https://example.com/file.tar.gz

# 이어받기
wget -c https://example.com/largefile.iso

# 백그라운드 다운로드
wget -b https://example.com/file.tar.gz

# 속도 제한
wget --limit-rate=1m https://example.com/file.tar.gz

↑ 목차로 돌아가기


ss

소켓 통계를 조회한다. netstat의 현대적 대체.

주요 옵션

옵션 설명
-t TCP 소켓
-u UDP 소켓
-l 리스닝 소켓
-n 숫자로 표시 (DNS 조회 안 함)
-p 프로세스 정보 표시
-a 모든 소켓

예제

# 리스닝 TCP 포트
ss -tlnp

# 모든 TCP 연결
ss -tan

# 특정 포트 확인
ss -tlnp | grep :80

# ESTABLISHED 연결
ss -t state established

# 프로세스별 연결 확인
ss -tp

↑ 목차로 돌아가기


netstat

네트워크 연결, 라우팅 테이블, 인터페이스 통계를 조회한다.

주요 옵션

옵션 설명
-t TCP 연결
-u UDP 연결
-l 리스닝 상태
-n 숫자로 표시
-p 프로세스 정보
-r 라우팅 테이블

예제

# 리스닝 포트 확인
netstat -tlnp

# 모든 연결 확인
netstat -an

# 라우팅 테이블
netstat -r

# 인터페이스 통계
netstat -i

↑ 목차로 돌아가기


ip

IP 주소, 라우팅, 네트워크 인터페이스를 관리한다.

주요 서브명령

명령 설명
ip addr IP 주소 조회/관리
ip link 네트워크 인터페이스 관리
ip route 라우팅 테이블 관리
ip neigh ARP 테이블 조회

예제

# IP 주소 확인
ip addr
ip a

# 특정 인터페이스
ip addr show eth0

# 라우팅 테이블
ip route
ip r

# 기본 게이트웨이 확인
ip route | grep default

# 인터페이스 활성화/비활성화
sudo ip link set eth0 up
sudo ip link set eth0 down

# IP 주소 추가
sudo ip addr add 192.168.1.100/24 dev eth0

↑ 목차로 돌아가기


dig

DNS 레코드를 상세하게 조회한다.

주요 옵션

옵션 설명
+short 간략 출력
-t TYPE 레코드 타입 지정
@SERVER DNS 서버 지정

예제

# A 레코드 조회
dig example.com

# 간략 출력
dig +short example.com

# MX 레코드
dig -t MX example.com

# NS 레코드
dig -t NS example.com

# 특정 DNS 서버로 조회
dig @8.8.8.8 example.com

# 역방향 조회
dig -x 8.8.8.8

↑ 목차로 돌아가기


nslookup

간단한 DNS 조회를 수행한다.

예제

# 기본 조회
nslookup example.com

# 특정 DNS 서버 사용
nslookup example.com 8.8.8.8

# 역방향 조회
nslookup 8.8.8.8

↑ 목차로 돌아가기


traceroute

대상까지의 네트워크 경로를 추적한다.

주요 옵션

옵션 설명
-n DNS 조회 안 함
-m N 최대 홉 수
-w N 타임아웃 초

예제

# 기본 추적
traceroute google.com

# DNS 조회 없이
traceroute -n google.com

# 최대 15홉
traceroute -m 15 google.com

↑ 목차로 돌아가기


scp

SSH를 통해 원격 서버와 파일을 복사한다.

주요 옵션

옵션 설명
-r 디렉토리 재귀 복사
-P PORT SSH 포트 지정
-i KEY SSH 키 파일 지정
-v 상세 출력

예제

# 로컬 → 원격
scp file.txt user@server:/path/to/dest/

# 원격 → 로컬
scp user@server:/path/to/file.txt ./

# 디렉토리 복사
scp -r mydir/ user@server:/path/to/dest/

# 포트 지정
scp -P 2222 file.txt user@server:/path/

# 키 파일 사용
scp -i ~/.ssh/mykey.pem file.txt user@server:/path/

↑ 목차로 돌아가기


rsync

파일을 효율적으로 동기화한다. 변경된 부분만 전송.

주요 옵션

옵션 설명
-a 아카이브 모드 (권한, 시간 보존)
-v 상세 출력
-z 압축 전송
--delete 소스에 없는 파일 삭제
--dry-run 테스트 실행
-e 원격 쉘 지정
--progress 진행 상태 표시

예제

# 로컬 동기화
rsync -av source/ dest/

# 원격 서버로 동기화
rsync -avz source/ user@server:/path/to/dest/

# 원격에서 로컬로
rsync -avz user@server:/path/to/source/ ./dest/

# 삭제 포함 완전 동기화
rsync -av --delete source/ dest/

# 테스트 실행
rsync -av --dry-run source/ dest/

# SSH 포트 지정
rsync -avz -e "ssh -p 2222" source/ user@server:/path/

# 진행 상태 표시
rsync -av --progress source/ dest/

↑ 목차로 돌아가기


7. 사용자 및 권한 관리

사용자 계정 관리, 파일/디렉토리 권한 설정, 접근 제어를 수행한다.
보안 정책 적용과 시스템 관리에 필수적인 명령어들이다.

명령어 리스트

Command Function
chmod 파일 권한 변경
chown 파일 소유자 변경
useradd 사용자 생성
usermod 사용자 수정
userdel 사용자 삭제
passwd 비밀번호 변경
sudo 관리자 권한 실행
su 사용자 전환
groups 그룹 확인

chmod

파일이나 디렉토리의 권한을 변경한다.

권한 표기법

기호 의미
r (4) 읽기
w (2) 쓰기
x (1) 실행
u 소유자
g 그룹
o 기타
a 전체

주요 옵션

옵션 설명
-R 재귀적 적용
-v 변경 과정 출력

예제

# 숫자 모드
chmod 755 script.sh    # rwxr-xr-x
chmod 644 file.txt     # rw-r--r--
chmod 600 secret.key   # rw-------

# 기호 모드
chmod +x script.sh     # 실행 권한 추가
chmod u+w file.txt     # 소유자 쓰기 권한 추가
chmod go-rwx file.txt  # 그룹/기타 모든 권한 제거

# 디렉토리 재귀 적용
chmod -R 755 /var/www/

# 디렉토리만 755, 파일만 644
find /var/www -type d -exec chmod 755 {} \;
find /var/www -type f -exec chmod 644 {} \;

↑ 목차로 돌아가기


chown

파일이나 디렉토리의 소유자와 그룹을 변경한다.

주요 옵션

옵션 설명
-R 재귀적 적용
-v 변경 과정 출력

예제

# 소유자 변경
sudo chown user file.txt

# 소유자와 그룹 변경
sudo chown user:group file.txt

# 그룹만 변경
sudo chown :group file.txt

# 재귀적 적용
sudo chown -R www-data:www-data /var/www/

↑ 목차로 돌아가기


useradd

새 사용자 계정을 생성한다.

주요 옵션

옵션 설명
-m 홈 디렉토리 생성
-s SHELL 기본 쉘 지정
-g GROUP 기본 그룹 지정
-G GROUPS 추가 그룹 지정
-d DIR 홈 디렉토리 경로 지정

예제

# 기본 사용자 생성
sudo useradd username

# 홈 디렉토리와 함께 생성
sudo useradd -m username

# 쉘과 그룹 지정
sudo useradd -m -s /bin/bash -G sudo,docker username

# 시스템 사용자 생성 (서비스용)
sudo useradd -r -s /usr/sbin/nologin serviceuser

↑ 목차로 돌아가기


usermod

기존 사용자 계정을 수정한다.

주요 옵션

옵션 설명
-aG GROUP 그룹에 추가
-s SHELL 쉘 변경
-L 계정 잠금
-U 계정 잠금 해제
-l NAME 사용자명 변경

예제

# 그룹에 추가
sudo usermod -aG docker username
sudo usermod -aG sudo username

# 쉘 변경
sudo usermod -s /bin/zsh username

# 계정 잠금
sudo usermod -L username

# 계정 잠금 해제
sudo usermod -U username

↑ 목차로 돌아가기


userdel

사용자 계정을 삭제한다.

주요 옵션

옵션 설명
-r 홈 디렉토리와 메일 스풀 함께 삭제
-f 강제 삭제

예제

# 사용자만 삭제
sudo userdel username

# 홈 디렉토리 포함 삭제
sudo userdel -r username

↑ 목차로 돌아가기


passwd

사용자 비밀번호를 설정하거나 변경한다.

주요 옵션

옵션 설명
-l 계정 잠금
-u 계정 잠금 해제
-d 비밀번호 삭제
-e 비밀번호 만료 (다음 로그인 시 변경 강제)

예제

# 자신의 비밀번호 변경
passwd

# 다른 사용자 비밀번호 변경 (root)
sudo passwd username

# 비밀번호 만료 설정
sudo passwd -e username

↑ 목차로 돌아가기


sudo

다른 사용자(주로 root) 권한으로 명령을 실행한다.

주요 옵션

옵션 설명
-u USER 특정 사용자로 실행
-i 로그인 쉘 시작
-s 쉘 시작
-l 허용된 명령 목록

예제

# root 권한으로 실행
sudo apt update

# root 쉘 시작
sudo -i

# 특정 사용자로 실행
sudo -u www-data whoami

# 허용된 명령 확인
sudo -l

↑ 목차로 돌아가기


su

다른 사용자로 전환한다.

주요 옵션

옵션 설명
- 로그인 쉘로 전환
-c CMD 명령 실행 후 복귀

예제

# root로 전환
su -

# 특정 사용자로 전환
su - username

# 명령 실행 후 복귀
su -c "whoami" username

↑ 목차로 돌아가기


groups

사용자가 속한 그룹을 확인한다.

예제

# 현재 사용자 그룹
groups

# 특정 사용자 그룹
groups username

↑ 목차로 돌아가기


8. 디스크 및 스토리지

디스크 용량, 파티션, 마운트 상태 등 스토리지 관련 정보를 확인하고 관리한다.
용량 모니터링, 스토리지 관리, 시스템 유지보수에 활용한다.

명령어 리스트

Command Function
df 디스크 사용량 확인
du 디렉토리 크기 확인
lsblk 블록 장치 목록
mount 파일 시스템 마운트
umount 파일 시스템 언마운트
fdisk 파티션 관리
blkid 블록 장치 UUID 확인

df

파일 시스템의 디스크 사용량을 확인한다.

주요 옵션

옵션 설명
-h 읽기 쉬운 단위 (GB, MB)
-T 파일 시스템 타입 표시
-i inode 사용량 표시

예제

# 디스크 사용량 확인
df -h

# 파일 시스템 타입 포함
df -hT

# inode 사용량
df -i

# 특정 경로
df -h /var

↑ 목차로 돌아가기


du

파일 및 디렉토리의 크기를 확인한다.

주요 옵션

옵션 설명
-h 읽기 쉬운 단위
-s 합계만 출력
-d N N 깊이까지만
--max-depth=N 최대 깊이
-a 파일 포함

예제

# 현재 디렉토리 크기
du -sh

# 하위 디렉토리별 크기
du -h --max-depth=1

# 큰 디렉토리 찾기
du -h --max-depth=1 | sort -hr | head -10

# 특정 디렉토리
du -sh /var/log/

# 용량 큰 파일/디렉토리 상위 10개
du -ah / 2>/dev/null | sort -hr | head -10

↑ 목차로 돌아가기


lsblk

블록 장치 정보를 트리 형태로 출력한다.

주요 옵션

옵션 설명
-f 파일 시스템 정보 포함
-a 빈 장치 포함
-o COLUMNS 출력 컬럼 지정

예제

# 기본 출력
lsblk

# 파일 시스템 정보 포함
lsblk -f

# 상세 정보
lsblk -o NAME,SIZE,FSTYPE,MOUNTPOINT,UUID

↑ 목차로 돌아가기


mount

파일 시스템을 마운트하거나 마운트 상태를 확인한다.

주요 옵션

옵션 설명
-t TYPE 파일 시스템 타입
-o OPTIONS 마운트 옵션
-a /etc/fstab의 모든 항목 마운트

예제

# 현재 마운트 상태
mount

# 장치 마운트
sudo mount /dev/sdb1 /mnt/data

# 타입 지정
sudo mount -t ext4 /dev/sdb1 /mnt/data

# 읽기 전용 마운트
sudo mount -o ro /dev/sdb1 /mnt/data

# ISO 파일 마운트
sudo mount -o loop image.iso /mnt/iso

# NFS 마운트
sudo mount -t nfs server:/share /mnt/nfs

↑ 목차로 돌아가기


umount

마운트된 파일 시스템을 언마운트한다.

주요 옵션

옵션 설명
-l Lazy 언마운트
-f 강제 언마운트

예제

# 언마운트
sudo umount /mnt/data

# 장치명으로 언마운트
sudo umount /dev/sdb1

# 강제 언마운트
sudo umount -f /mnt/stuck

# Lazy 언마운트 (사용 중이어도)
sudo umount -l /mnt/busy

↑ 목차로 돌아가기


fdisk

디스크 파티션을 관리한다.

주요 옵션

옵션 설명
-l 파티션 목록 출력

예제

# 모든 디스크 파티션 목록
sudo fdisk -l

# 특정 디스크 파티션 작업
sudo fdisk /dev/sdb
# 대화형 명령: n(새 파티션), d(삭제), p(출력), w(저장)

↑ 목차로 돌아가기


blkid

블록 장치의 UUID와 파일 시스템 정보를 확인한다.

예제

# 모든 장치 정보
sudo blkid

# 특정 장치
sudo blkid /dev/sda1

# UUID만 출력
sudo blkid -s UUID -o value /dev/sda1

↑ 목차로 돌아가기


9. 압축 및 아카이브

파일 압축, 해제, 아카이브 생성을 수행한다.
백업, 배포 패키지 생성, 로그 아카이빙 등에 활용한다.

명령어 리스트

Command Function
tar 아카이브 생성/해제
gzip gzip 압축/해제
gunzip gzip 압축 해제
zip zip 압축
unzip zip 압축 해제
zcat 압축 파일 내용 출력

tar

파일을 아카이브로 묶거나 압축한다.

주요 옵션

옵션 설명
-c 아카이브 생성
-x 아카이브 해제
-v 상세 출력
-f FILE 파일명 지정
-z gzip 압축
-j bzip2 압축
-J xz 압축
-t 내용 목록 확인
-C DIR 대상 디렉토리 지정

예제

# tar.gz 생성
tar -czvf archive.tar.gz directory/

# tar.gz 해제
tar -xzvf archive.tar.gz

# 특정 디렉토리에 해제
tar -xzvf archive.tar.gz -C /path/to/dest/

# 내용 확인 (해제 없이)
tar -tzvf archive.tar.gz

# tar.bz2 생성
tar -cjvf archive.tar.bz2 directory/

# 특정 파일만 아카이브
tar -czvf logs.tar.gz /var/log/*.log

# 특정 패턴 제외
tar -czvf backup.tar.gz --exclude='*.tmp' directory/

↑ 목차로 돌아가기


gzip

파일을 gzip으로 압축한다. 원본 파일 대체.

주요 옵션

옵션 설명
-d 압축 해제
-k 원본 파일 유지
-v 상세 출력
-1~-9 압축 레벨 (9가 최대)

예제

# 압축
gzip file.txt           # → file.txt.gz

# 원본 유지하며 압축
gzip -k file.txt

# 압축 해제
gzip -d file.txt.gz

# 최대 압축
gzip -9 largefile.txt

↑ 목차로 돌아가기


gunzip

gzip 압축을 해제한다.

예제

# 압축 해제
gunzip file.txt.gz

# 원본 유지
gunzip -k file.txt.gz

↑ 목차로 돌아가기


zip

파일을 zip 형식으로 압축한다.

주요 옵션

옵션 설명
-r 디렉토리 재귀 포함
-e 암호 설정
-9 최대 압축

예제

# 파일 압축
zip archive.zip file1.txt file2.txt

# 디렉토리 압축
zip -r archive.zip directory/

# 암호 설정
zip -e secure.zip file.txt

# 최대 압축
zip -9 -r archive.zip directory/

↑ 목차로 돌아가기


unzip

zip 파일을 해제한다.

주요 옵션

옵션 설명
-d DIR 대상 디렉토리 지정
-l 내용 목록 확인
-o 덮어쓰기 확인 없이

예제

# 압축 해제
unzip archive.zip

# 특정 디렉토리에 해제
unzip archive.zip -d /path/to/dest/

# 내용 확인
unzip -l archive.zip

↑ 목차로 돌아가기


zcat

압축 파일의 내용을 해제 없이 출력한다.

예제

# gzip 파일 내용 출력
zcat file.txt.gz

# 파이프와 함께 사용
zcat access.log.gz | grep "404"

# 여러 파일
zcat *.gz | grep "error"

↑ 목차로 돌아가기


참고 자료


최종 업데이트: 2024년

1. 구조화된 학습 환경 및 일정

  • 시각적 일정 관리: 시각화된 스케줄(캘린더, 차트)을 통해 예측 가능성을 높여 불안감 줄이고 집중력을 향상시킬 수 있습니다 .
  • 작업 분할(Chunking): 과제를 10~20분 단위로 나누면 ADHD 학습자의 인지적 부담을 줄이고 몰입에 도움을 줍니다 .

2. 휴식과 시간관리 기법

  • 포모도로 기법(Pomodoro): 20~25분 집중 후 5분 휴식, 4회 반복 후 장시간 휴식. ADHD 학습자에게 효과적이라는 실증 연구 결과 있습니다 collegenp.com.
  • 규칙적인 휴식과 운동: 스트레칭, 짧은 걷기, 신체 활동은 과잉행동을 완화하고 집중력을 회복하는 데 도움을 줍니다 collegenp.com+3listening.com+3thetimes.co.uk+3.

3. 감각 자극(self-regulation) 전략

  • 건설적 피짓(fidgeting): ADHD 학습자의 손놀림은 집중력 향상 메커니즘으로, 무해한 피젯 도구(fidget toy, stress ball) 사용이 권장됩니다 .
  • 백색소음·자극 음악: 반복적 자극은 주의 지속시간을 늘려줍니다. 음악이나 특정 소음은 집중에 효과적이라는 연구 결과가 있습니다 .

4. 동반자 효과(body doubling)

  • Body Doubling: 함께 공부하는 동반자가 실제 혹은 온라인으로 옆에 있을 때 집중이 극대화됩니다.

5. 기술 및 보조 도구 활용

  • AI 자동 필기/녹취 도구: 수업 내용을 놓치지 않고 다시 복습할 수 있어 부담 완화
  • 차단 앱(예: Freedom, Cold Turkey): SNS·게임 등 유혹 차단을 통해 주의 산만을 줄입니다
  • 시각적 자료 활용: 마인드맵, 플래시카드, 컬러노트 등은 ADHD 학습에 도움이 됩니다 .

6. 메타인지 및 자기조절 전략

  • 메타인지 교육: 자기-questioning, 체크리스트, 플래닝은 ADHD 학습자의 집중 유지에 유의미합니다 .
  • 자기 모니터링: 주의를 돌린 순간을 인식하고 행동을 되돌리는 리플렉션 훈련이 도움이 됩니다 .

7. 심리적·환경적 조력

  • 학교·기관의 지원: 장애인지원센터를 통해 시험 연장, 영상 녹화 접근, ADHD 코치 등의 제도를 활용할 수 있습니다 .
  • 신체·정서적 안정 관리: 충분한 수면, 수분 섭취, 규칙적 운동은 기본 집중력 유지에 필수입니다

+ Recent posts